Job Profiles Dynamic Object
Use the Job Profiles Dynamic Object to provide Users with a means to view their own Job Profiles. You can include a variety of columns on the tag, including Skill Score®. The Job Profiles dynamic object is categorized as a Wizard View. The Wizard takes you through a series of steps in order to place the dynamic objects on the page. On any LearnCenter page:
- Click
 in the management control icons section. The page you are viewing opens in Edit Mode.
- Click
 to modify an existing area of the page.
or
Click Insert New Area Here, select Free-Form (Text and Graphics) from the Area Type drop-down list, and click Create.
- Place your cursor anywhere on the page, and click
 . The Dynamic Object window opens.
- Click
 next to Advanced Learning in the Object Types panel.
- Click Job Profiles. The Job Profiles Wizard opens.
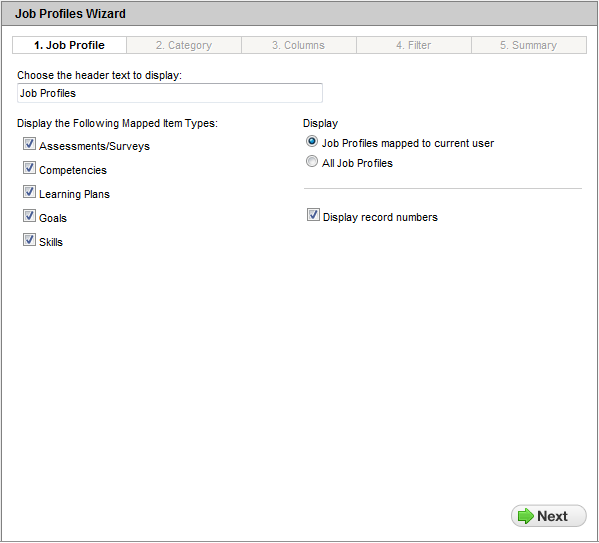
- Type a new Header Text to Display to Users.
or
Use the default text ("Job Profiles").
- Click any of the following for Display the Following Mapped Item Types:
- Assessments/Surveys – to display Assessments and surveys mapped to the Job Profile.
- Competencies - to display Competencies mapped to the Job Profile.
- Learning Plans - to display Learning Plans mapped to the Job Profile.
- Skills - to display skills mapped to the Job Profile.

|
You must select at least one mapped item. By default, all are selected. |
- Click one of the following for Display:
- Job Profiles mapped to current User - to display only those Job Profiles mapped to the current User. (Default)
- All Job Profiles - to display all profiles in the LearnCenter and not just those associated with the current User.
- Click Next.
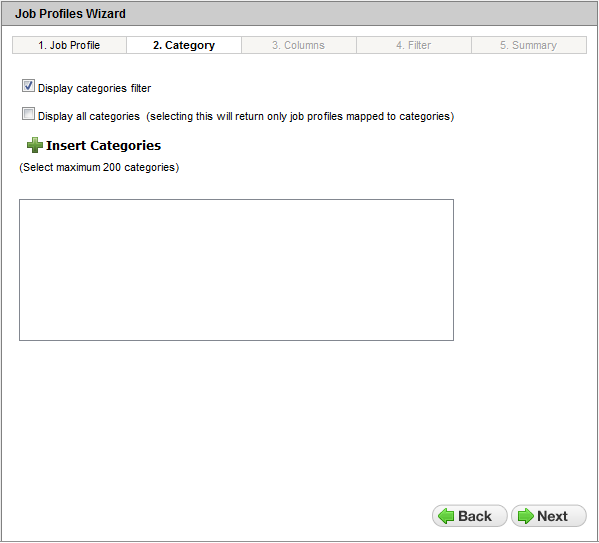
- Click the check box for Display Categories Filter to display the Categories filter to Users. (Default)
or
Clear the check box to hide the Categories filter from Users.
- Click the Display All Categories check box to display only Job Profiles that are mapped to Categories to Users.
or
Clear the check box to show Job Profiles regardless of whether they are associated with Categories. (Default)
- (Optional) Click Insert Categories and use the Category Selector pop-up to indicate which specific Categories should be included in the dynamic object.
- Click Next.
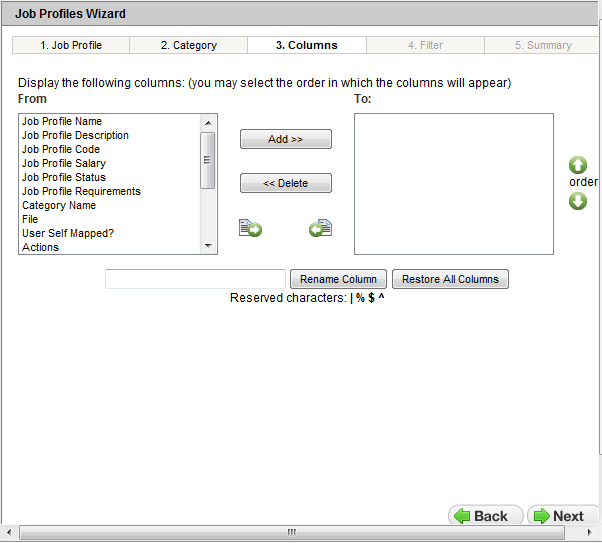
- Indicate which columns to display to Users by moving those columns in the From box to the To box. You can double-click the items in the From box, or click an item and then click the right arrow, or click Move List to move all columns in the From box to the To box.

|
The more columns you include, the slower the software performance will be.
|
You can change a column name by highlighting it in the To box, typing the new name in the blank field at the bottom of the window, and clicking Modify Column. You can click Restore All Columns to return the columns in the To box to the From box and resets any of the column name changes you made back to their original values.
If you selected All Job Profiles on the Job Profiles tab, columns associated with User status (such as Mapped Item Name, Mapped Item Description, Mapped Item Type, Mapped Item Start Date, Mapped Item End Date, Mapped Item Completed Date, Mapped Item Status) are not available for selection.
- Click Next.
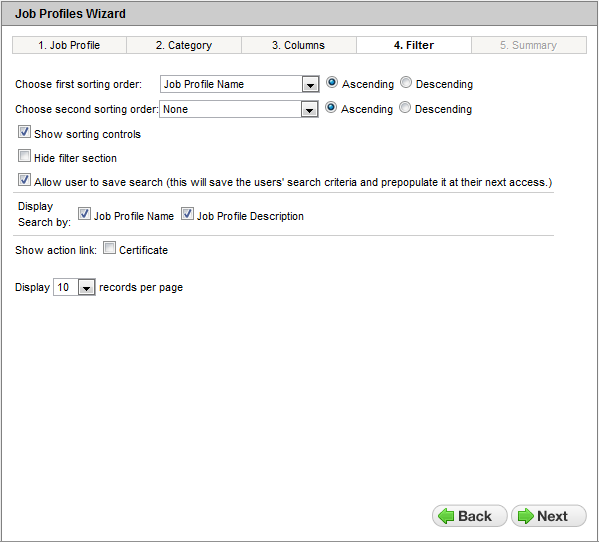
- Indicate how you would like the Job Profiles to sort on the page by selecting one item from the Choose first sorting order drop-down list. This list contains the column names you selected on the Columns tab.
- Click one of the following options:
- Ascending – to sort the list in an ascending manner.
- Descending – to sort the list in a descending manner.
- (Optional) Indicate a second level of sorting by selecting one item from the Choose second sorting order drop-down list.
- Click one of the following options:
- Ascending – to sort the list in an ascending manner.
- Descending – to sort the list in a descending manner.
- Click the Show sorting controls check box to indicate you want the sorting controls to be displayed for Users to sort items for themselves. (Default)
or
Clear the check box to hide the sorting controls from view.
- Click the Hide Filter Section check box to hide the filter section from Users.
or
Clear the check box to show the filter section to Users. (Default)
- Click the Allow User to Save Search check box to enable Users’ settings to persist upon their next visit to this dynamic object. The next time Users visit the page containing this dynamic object, it will display to them using the search criteria they last entered. (Default)
or
Clear the check box if you want Users to re-enter search criteria the next time they visit the page containing this dynamic object.
- Click the Display Search by Job Profile Name check box to enable Users to filter the results by Job Profile name. (Default)
or
Clear the check box to prevent Users from filtering by Job Profile name.
- Click the Display Search by Job Profile Description check box to enable Users to search the results by Job Profile description. (Default)
or
Clear the check box to prevent Users from filtering the results by Job Profile description.
- Click the Certificate check box to display any certificates mapped to completed Job Profiles in the Actions column of the dynamic object.
or
Clear the check box to prevent mapped certificates from displaying in the Actions column of the dynamic object.
|
|
For the certificate to display to Users, you must also select the Actions column
on the Columns tab. |
- Select a number from the Display [x] records per page drop-down list to indicate how many Job Profiles you want to display per page. The default is 10.
- Click Next. The Summary tab displays a summary of the selections you made throughout the wizard.
- Click Return Selected to submit your selections and add the dynamic object to the LearnCenter page.
- On the WYSIWYG tool bar, click
 .
.
- Click
 to review how your selections will appear to Users.
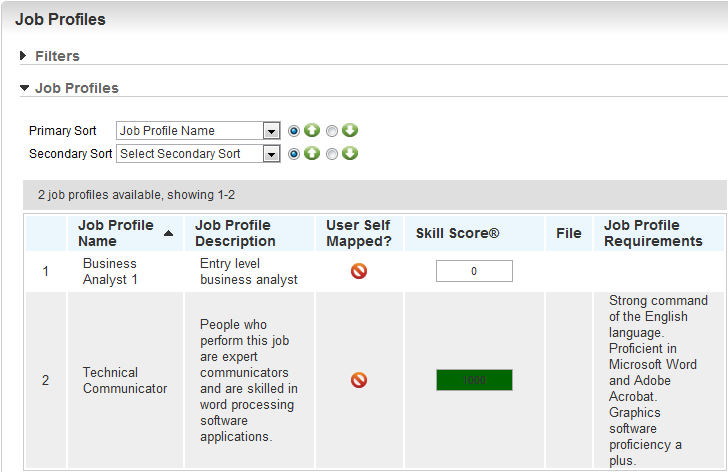
What Users See
The following is an example of what Users might see based on the selections the Admin made when inserting the dynamic object on the page.
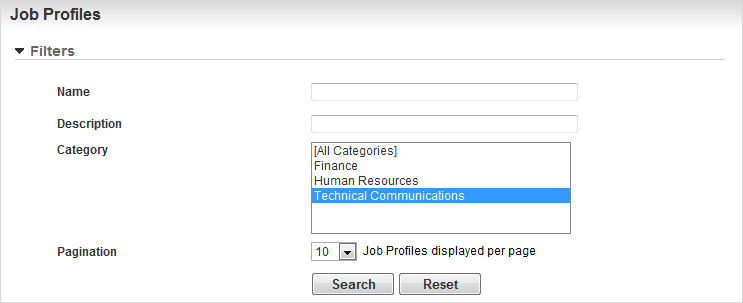
The Filters panel is collapsed by default the first time a User views the dynamic object. If a User expands the filter and leaves the page, the expanded state persists until the next visit if you clicked the Allow User to Save Search check box in the wizard for the dynamic object.
Users can determine how many results display per page using the Display drop-down list. The default is 10 unless you specified otherwise when setting up the DO.
If the Job Profile Description exceeds 250 characters, a more link displays indicating the User can click it to view more of the description.
The information for the Job Profiles listed in the Job Profiles panel is collapsed upon first viewing the DO, but can be expanded by clicking the next to each Job Profile Name.
Any skills or Assessments/Surveys mapped to the Job Profile are listed as hyperlinks so that the User can click them and view additional information or functionality. If a Job Profile is mapped to more than one category, a more link displays in the Category Name column. If a User clicks this link a window opens displaying all of the Categories to which the Job Profile is mapped.
 Related Topics

Copyright © 2010-2018, Oracle and/or its affiliates. All rights reserved.