You are here: Courses > Adding Courses with the WYSIWYG Course Editor > Adding an Image to a WYSIWYG Course

Adding an Image to a WYSIWYG Course

You can add images to WYSIWYG Courses in several ways. Typically, you will add files that you previously uploaded to Resource Manager. If there are files you want to use and you have not already uploaded them to Resource Manager, you can do so while adding them to your Course. Another way you can add images to your Course is to point to their locations on the Internet. See the following sections for instructions on each of these methods.

Adding Images from Resource Manager

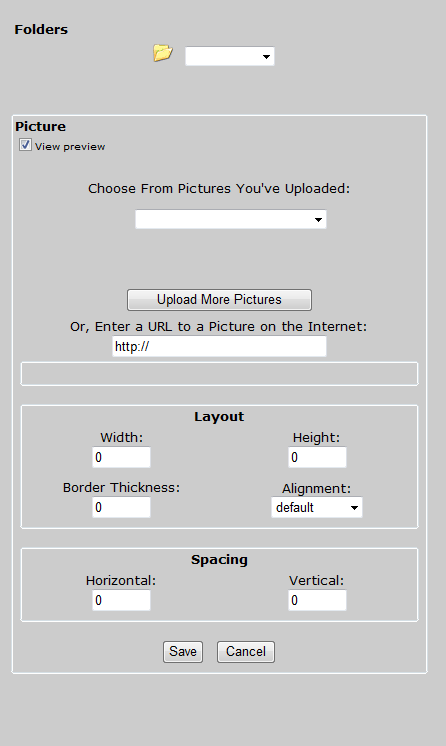
If you have already uploaded the images you want to use in your Course to Resource Manager, follow these steps. In the WYSIWYG Course Editor:

  1. Place your cursor at the spot on the page where you want the image inserted.
  2. Click .

  1. Select Images from the Folders drop-down list.
  2. Select the View Preview check box if you want to see the picture you select. (Default)
    or
    Clear the check box to prevent the preview from displaying.
  3. In the Choose From Pictures You’ve Uploaded drop-down list, select the image you want to use.
Images must first be uploaded to Resource Manger before you can add them to a Course. If you have not already uploaded the file you want to use, you can do it now from this window. See Uploading Images from Your Computer below for instructions.
  1. Type the Width of the image in pixels.
  2. Type the Height of the image in pixels.
If Height and Width are not set, the image will be inserted at its actual size. Once inserted, an image can be resized in the editor by clicking on it and using the surrounding handles to adjust the shape.
  1. Type the Border Thickness around the image in pixels.
  2. Select an Alignment position from the drop-down list.
  3. Type the Horizontal spacing size in pixels that the image should be placed relative to the insertion point.
  4. Type the Vertical spacing size in pixels that the image should be placed relative to the insertion point.
  5. Click Save.

Uploading Images from Your Computer

If you have not already uploaded the file you want to the Resource Manager, you do not need to navigate away from this window to do so. You can upload additional images the Resource Manager directly from this window. In the WYSIWYG Course Editor:

  1. Place your cursor at the spot on the page where you want the image inserted.
  2. Click .
  3. Click Upload More Pictures.
  4. In the Directory to upload to drop-down list, select Images.
  5. Click Browse and search your computer for the image you want to upload.
  6. Select the file and click Open.
  7. Repeat the previous two steps until you have added each image you want to upload. (You can upload 10 files at once.)
  8. Click Upload. A dialog box displays the upload status.
  9. Click Return. The Pictures pop-up window opens.
  10. The uploaded images are listed in the Preview drop-down list.
  11. To add one of the uploaded images now, select it from the Preview drop-down list then click Save.

Uploading Images from a Location on the Internet

You can upload images from the Internet to be used in your Course. In the WYSIWYG Course Editor:

  1. Browse to the web page that contains the image you want to use.
  2. Right-click the image and select Properties.
  3. Highlight the entire URL Address of the image, then press CTRL+C on your keyboard to copy it.
  4. Click OK to close the window.
  5. In the WYSIWYG Course Editor, place your cursor at the spot where you want the image inserted.
  6. Click .
  7. In the Enter a URL to a Picture on the Internet box, highlight the existing text (http://) then press CTRL+V on your keyboard to paste the URL of the picture’s location.
  8. Click Save.

Related Topics IconRelated Topics


Copyright © 2010-2015, Oracle and/or its affiliates. All rights reserved.