
LearnCenter Search enables you to provide a robust search mechanism for your end Users. Using this dynamic object, your Users will be able to search for and filter through content available in LearnCenter, using the keywords, AND, OR, and NOT phrases, and wild cards. Once search results are returned, they can also see what their status is in relation to the items in the results. For example, Users can see if they have started or completed any Learning Plans that are returned in their search results.
|
|
Any changes to items that are searchable are immediately added to a queue for processing. You can monitor the status of your changes in the Control Panel under Tools > Task Manager. Processing times will vary based on the number and type of changes requested. |
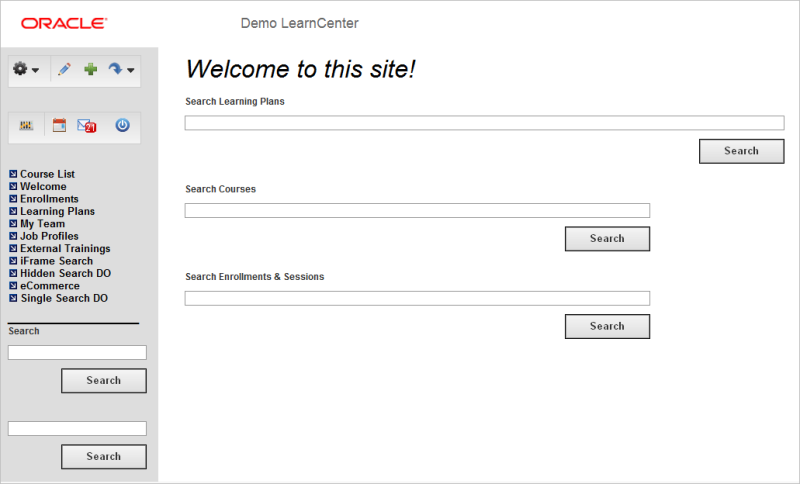
You can add as many instances of the dynamic object to the page as you want or require. The illustration below depicts a LearnCenter page with multiple instances of the new dynamic object, some using custom header text. Notice that the search field can be added either to the Left Nav Bar or the main LearnCenter page.
To insert this dynamic object, follow these steps. On any LearnCenter page:

 in the management control icons section. The page you are viewing opens in Edit Mode.
 to modify an existing area of the page or the Left Nav Bar.
 . The Dynamic Object window opens.
 next to LearnCenter in the Object Types panel.
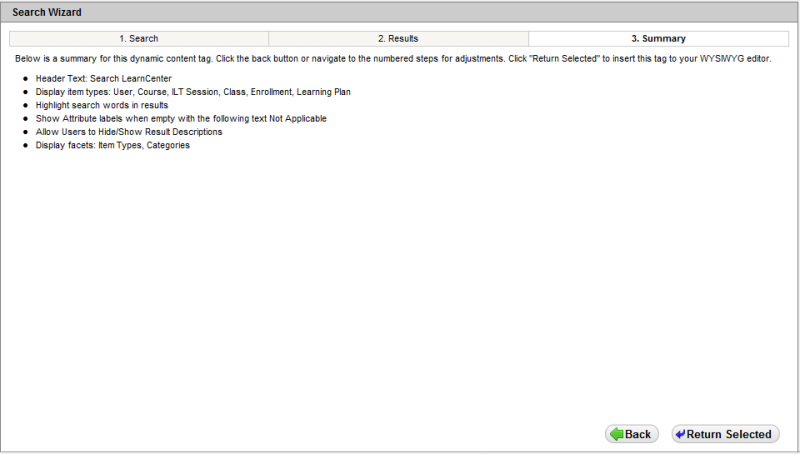
A wizard opens. Use it to customize what LearnCenter items are included in the search results, how those results are presented to Users, and what filters are available to them to narrow the results.
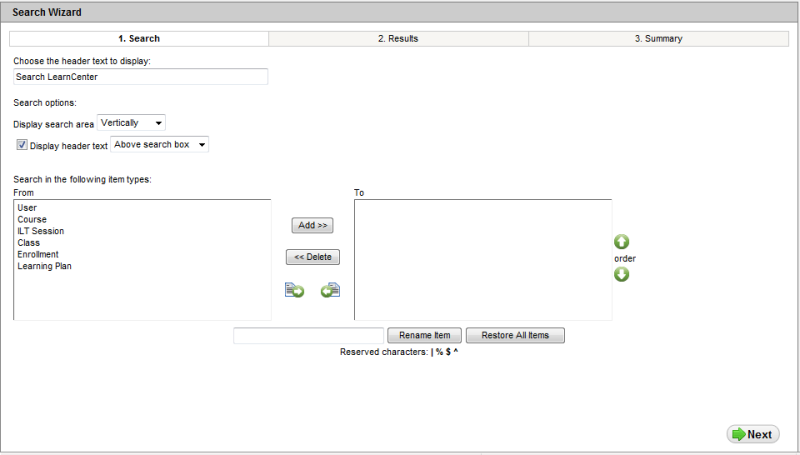
(Optional) On the Search tab, change the header text that displays to Users in the Choose the header text to display field. The default text is "Search LearnCenter", but you may want this to read as "Search for Learning Plans", or "Find Courses", or some other wording of your choosing depending on what items you select for the search criteria.
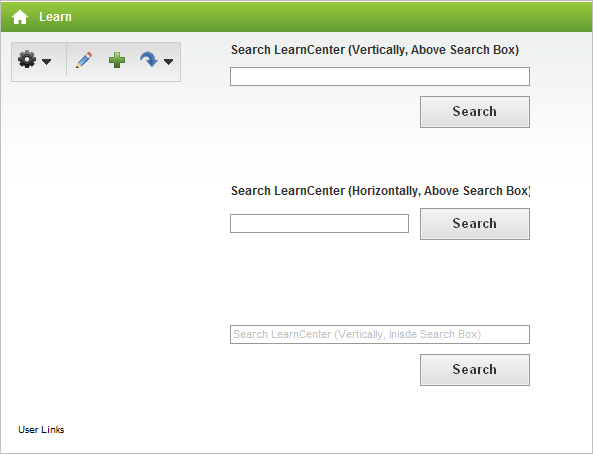
The following example page demonstrates some of the possible layouts for this field.
 to move all items to the right hand box. The LearnCenter items currently available for this feature include:
Click Next. Use the Results tab to indicate the output attributes for the search results.
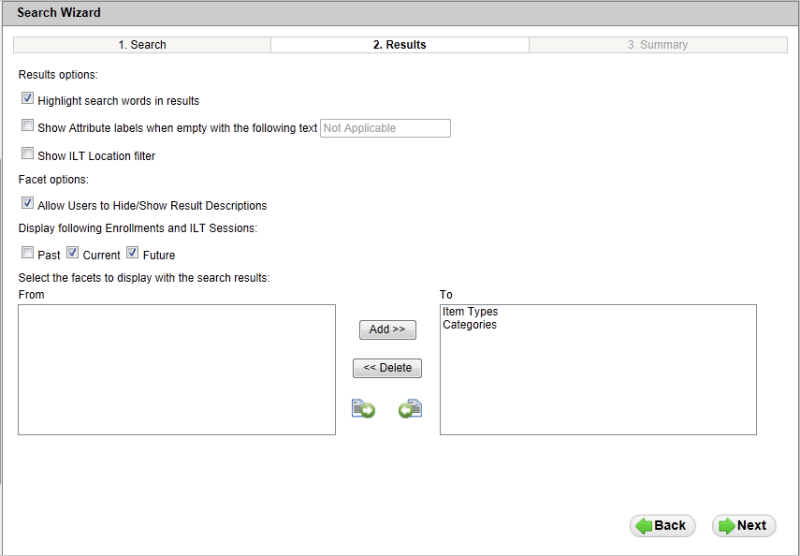

If you do not select the Show attribute labels when empty with the following text check box, results with attributes that have no values do not display the attribute label at all. The example below shows the same User as the first illustration who is not mapped to a Category. Since the Category attribute has no value, and the check box was not selected in the dynamic object wizard, "Categories" does not display in the description for this User.

 to move both facets to the left box.
 .
. to review how your selections will appear to Users.
Initially, Users will simply see a Search field in the area of the page in which you inserted the dynamic object. In the illustration below, there are multiple search fields using the new LearnCenter Search dynamic object. The field label can be changed in the dynamic content tag wizard by updating the text in the Choose the header text to display field, located on the Search tab. (See illustration in the previous section.)

|
By default the search object will expand to the size of the container it is placed in. The width of the Search field can be modified using HTML DIV tags. See Sizing the Search Dynamic Object Using HTML below for re-sizing instructions. |
Users can then type keywords into the field and click Search. The page refreshes and results display on the page. Below is an example where a User typed the word "agile" in the Search LearnCenter field.
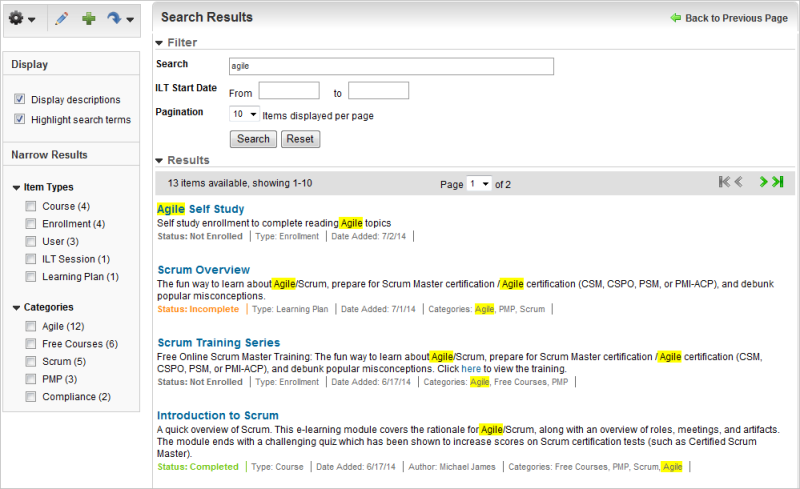
Various filtering facets appear on the Left Nav Bar, and search results display on the right. In the illustration above, notice that the item types returned in the results include an ILT Session, a Learning Plan, Courses, Enrollments, and Users, all of which contain "agile" in either the title or category displayed.
In the Filters section, Users can determine how many results they would like to see on a page by using the Pagination drop-down list. If ILT Sessions are search-able, the ILT Start Date date range fields also display in the Filters section.
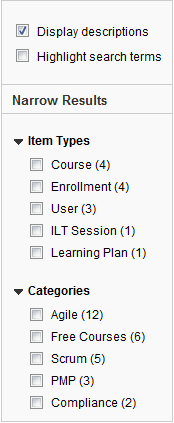
Users can change the way items display, and what types of items display by using the check boxes under the Display section. Selecting Highlight search terms causes keywords to be highlighted in yellow. Clearing the check box turns off the yellow highlighting. Selecting the Display Descriptions check box causes the descriptions beneath the items to display. Clearing the check box hides the descriptions. The default settings for both of these check boxes can be determined in the dynamic object wizard.
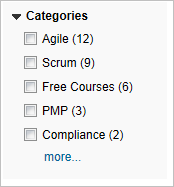
Users can use the Narrow Results section to further specify what displays in the result list. Facet results show the five highest count items and then Users have the ability to click more… to see additional 20 options (25 total).
By default, all Item Types and all Categories are returned when a Users clicks Search. Selecting the Item Type or Category check boxes removes the unwanted types from the results. For example, perhaps Users want to display only Learning Plans that are categorized as Compliance. They can do this by selecting the Learning Plan and Compliance check boxes. All other items are removed from the search results.
Users can see their current status with regard to items that allow open enrollment or mapping (with or without approvals).

Clicking a result item's title enables Users to enroll in or drop the item, start the item, see related prerequisites, etc. depending on the item's settings.
Clicking the result names in the list result in the following:
 next to a username to send a message to that User. The Com System opens and you can create and send the message. Only active Users with non-expired memberships can be found in search.
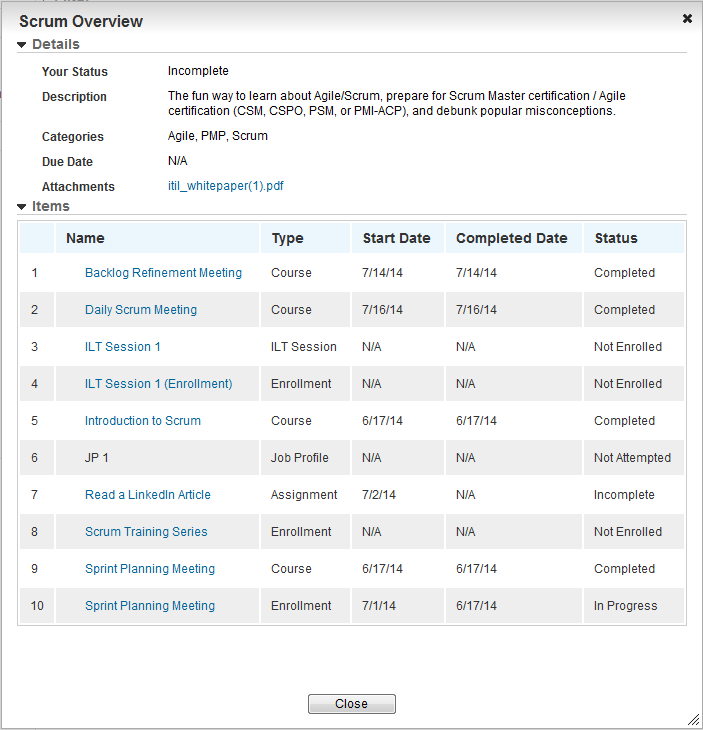
If the Learning Plan allows self-mapping and a User is not mapped, the “Register for this Learning Plan” action is displayed. The Status indicates the User's status with regard to the Learning Plan. If the User has completed the Learning Plan, and a certificate was mapped, then the View Certificate icon displays. Users can click it to display their achieved certificate.If the Learning Plan has attachments, they will appear as links for Users to click on. The Learning Plan window can be moved and re-sized by end Users as needed.
If you used the Show ILT Location filter, Users will initially see all locations selected. They can then filter for the locations they want to see by moving the locations to the left box.
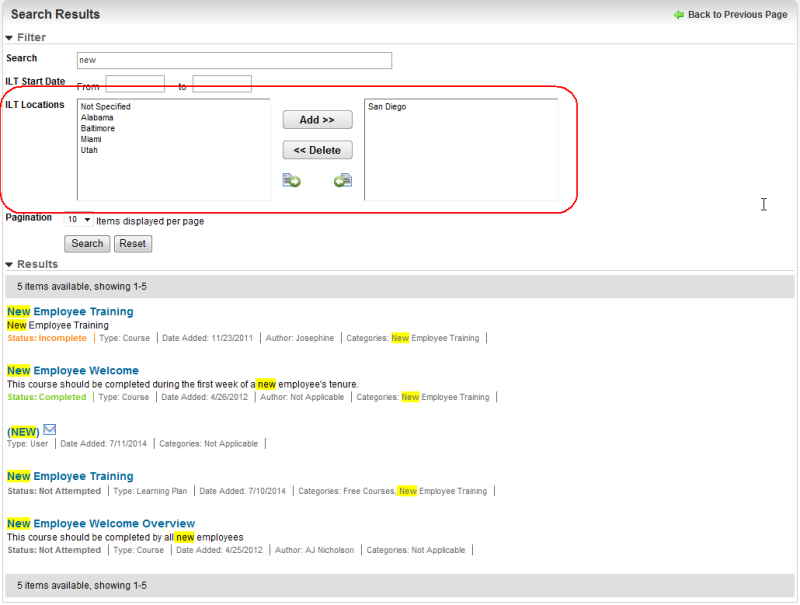
You can use a location description of "Not Specified" for those sessions that do not have location information associated with them. Users must select at least one location when this box displays. (See Physical Locations for details on the Locations functionality.)
Users can search for keywords in several ways.
Advanced search terms can be used in combination with one another. For example: “mandatory for comp*“ NOT Supervisors OR “Level1 Welders”.
Users can use parenthesis to group terms. For example: Compliance AND (Ethics OR Harassment). LearnCenter will retrieve results having the terms "Compliance" and "Ethics", as well as items with "Compliance" and "Harassment".

|
Search is not case sensitive. The Search operators AND, OR and NOT must be in English for this first phase of the Search feature. The Search field is limited to 100 characters. For all other keywords, you can search using any supported language. The search term must be found in the item for the item be returned. When using the search operators AND and NOT, tests are performed against each part of a result (i.e. name, description, standard and custom fields) to see if they meet the search criteria entered. If each part of a result passes the test, the result will be included or excluded based on the operator used. If one part of the result fails the test to match the search criteria, then a User may see results they would not expect to see. |
The Search index includes an item’s name,description, all custom fields, and certain standard fields (see the table below for specifics). Search results with matches in name and description will rank higher in the results than those without name or description matches. It is possible for an item to be returned in the search results, but not have any highlighted terms, because the match was on an attribute or element that isn't displayed in the search result description.
Relevancy ranking is determined based on where the search term is found:
The results will include items made available in the Global Search functionality. (See Global Search for details about this existing feature.)
The following standard fields can cause an item to display in search results if their values match the entered search terms.
| Item Type | Searched Standard Field |
|---|---|
| Courses | Name |
| Description | |
| Author | |
| Series Name | |
| Series Number | |
| Course Level | |
| Publisher | |
| Course Number | |
| Classes | Name |
| Description | |
| Author | |
| Series Name | |
| Series Number | |
| Course Level | |
| Publisher | |
| Course Number | |
| Users | Username |
| First Name | |
| Last Name | |
| Street1 | |
| Street2 | |
| City | |
| State | |
| Postal Code | |
| Country | |
| Day Phone | |
| Evening Phone | |
| Pager | |
| Interactive Phone | |
| Mobile Phone | |
| Fax | |
| Email2 | |
| SSN | |
| Gender | |
| Nickname | |
| Spouse Name | |
| Company | |
| Job Title | |
| Department | |
| Manager Name | |
| Office | |
| Profession | |
| Enrollments | Name |
| Description | |
| ILT Sessions | Name |
| Description | |
| Author | |
| Series Name | |
| Series Number | |
| Course Level | |
| Publisher | |
| Course Number | |
| Start Date | |
| Learning Plans | Name |
| Description |
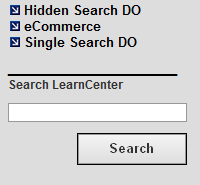
The LearnCenter Search dynamic object automatically sizes based on the size of the area in which it was placed. For example, if you place it in the Left Nav Bar, it will look similar to the following illustration:
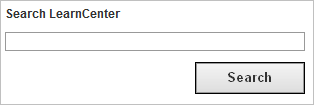
When placed on a page area, the dynamic object will size to the page, similar to the following illustration.

You can control the size of the LearnCenter Search dynamic object by placing it in a DIV tag. To do this, follow these steps:
At the end of the <img> tag and add the following:
<div style="width: 600px">
(Replace 600px with what is appropriate for your page.)
When you are done, it should look something like the following:

, and then click to preview the dynamic object. The dynamic object is re-sized.
You have the ability to exclude specific search-able items from the search results.
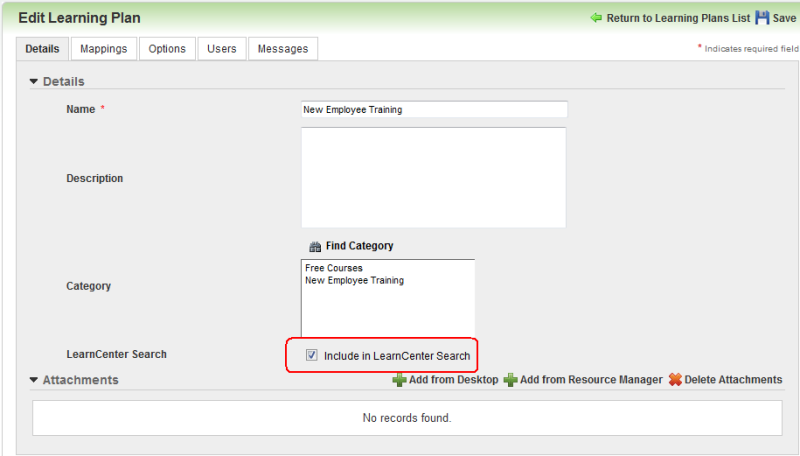
This enables you to control what items can be returned as results. By default, all search-able items are included in the search results. You can exclude specific items from the search results by clearing the Include in LearnCenter Search check box on the pages where you add or edit the properties of an item, such as:
Whether or not an item is search-able is only visible to Admins on the above mentioned Control Panel pages. When you clear the check box for an item, it cannot be found in any LearnCenter Search dynamic object, regardless of any Global Search Settings.

Copyright © 2010-2015, Oracle and/or its affiliates. All rights reserved.
 Related Topics