Skill Network Dynamic Object
Use the Skill Network Dynamic object to view a graphical representation of User skills gaps that would need to be filled before they could be considered qualified for a particular job or role.

|
This dynamic object and the Career Planing dynamic object category are only visible if you have activated the Skill Network feature for your LearnCenter. This feature is free of charge, but must be activated for you by Customer Support. Contact Customer Support through My Oracle Support for further details. |
On any LearnCenter page:
- Click
 in the management control icons section. The page you are viewing opens in Edit Mode.
- Click
 to modify an existing area of the page.
or
Click Insert New Area Here, select Free-Form (Text and Graphics) from the Area Type drop-down list, and click Create.
- Place your cursor anywhere on the page, and click
 . The Dynamic Object window opens.
- Click
 next to Career Planning in the Object Types panel.
- Click Skill Network.
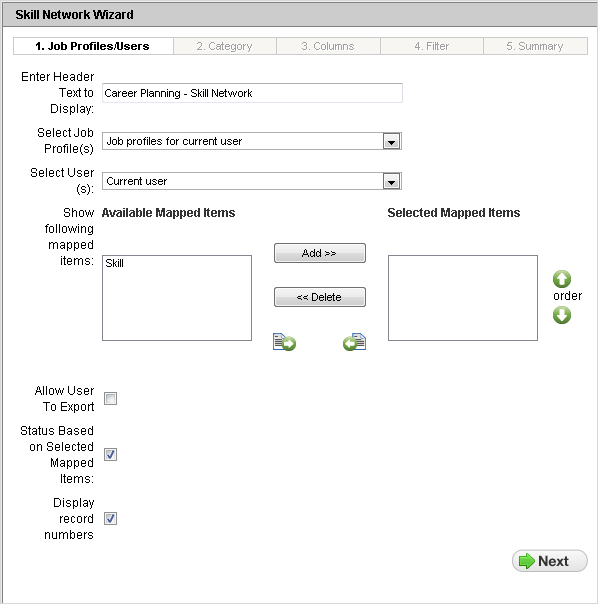
- (Optional) Type customized text for the Enter Header Text to Display field. (Default is Career Planning - Job Profile)
- Select one of the following from the Select Job Profile(s) drop-down list.
- Job Profiles for Current User - to show only the Job Profiles for the User viewing the DO.
- Job Profiles for Selected Categories - to Job Profiles for selected categories only. Selecting this item automatically clicks the Display All Categories check box in Step 2 of the Wizard.
- Selected Job Profiles - to indicate you want to display specific profiles only. Selecting this option displays a Job Profile selector so that you can indicate which Job Profiles to include in the DO.
- Job Profiles from Current LearnCenter - to indicate you want to show all Job Profiles in the current LearnCenter. It also displays any global Job Profile from other LearnCenters.
- Let User Choose - to indicate you want to show a Job Profile selector to the Users to allow them to select one or more Job Profiles.
- Select one of the following from the Select User(s) drop-down list.
- Current User - to show only the current User.
- Users Mapped to select Job Profiles - to show Users mapped to specific Job Profiles.
- Selected Users - to show only specific Users. Selection this option causes a User selector to display, from which you can select the appropriate Users.
- Users from the Selected Groups - to show only Users from specific groups. Selecting this item displays a group selector from which you can select the appropriate groups. All Users from the groups you select will display on the DO.
- Users that the current User supervises - to show only Users that report to the current User. If the current User is not a supervisor, or does not currently supervise anyone, then the tag automatically displays the current User.
- Top “N” Best Match Users for the selected Job Profiles - to show only the top “N” Users who have best achieved the Job Profile or who are closest to achieving it (where N stands for the number you select; the default is 10). LearnCenter uses skills mapped to the selected Job Profiles to look for Users who have achieved the skills. Users do not have to be mapped to the Job Profile to display in this list. LearnCenter looks into all items mapped to the Job Profile to locate the Users who best match the profile.
- Let User Choose - to indicate you want to show a User selector to the Users to allow them to select one or more Users.
- Use the boxes for Show the following mapped items to indicate which items you want to display in the dynamic object. Double-click items in the Available Mapped Items box to move them to the Selected Mapped Items box. You can also click an item and then click the right arrow, or click Move list to move all items in the Available Mapped Items box to the Selected Mapped Items box. Currently, Skills is the only item available for this feature. Additional mapped items will be added for use in a future release of LearnCenter.
- Click the Allow User to export check box to allow Users to export the Job Profile information displayed in the DO in .CSV or Microsoft® Excel file.
or
Clear the check box to prevent Users from exporting the Job Profile information from the DO.(Default)
- Click the Status Based on Selected Mapped Items check box to calculate the Job Profile Status based only on certain mapped items you select (currently Skills is the only item available for selection).
or
Clear the check box to display the Job Profile Status, calculated based on all mapped items. (Default)
- Click the Display Number of Records check box to display the row number to the left of each record. (Default).
or
Clear the check box to hide the row number to the left of each record.
- Click Next.
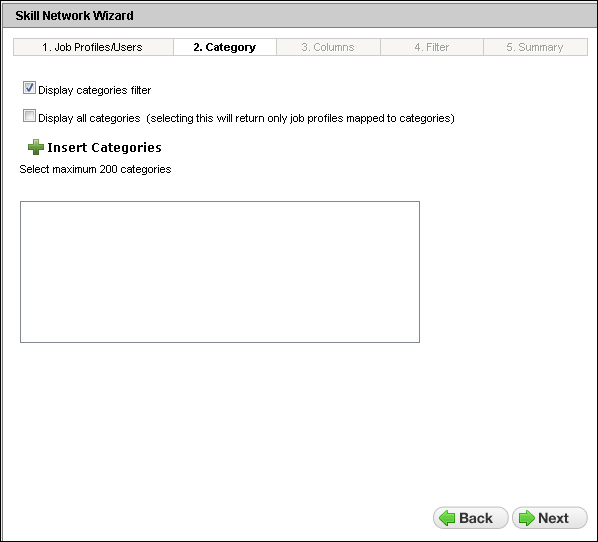
- Click the Display Categories Filter check box to display a filter on the DO for individuals to use for searching for Job Profiles by category. (Default) If you click this check box, click Insert Categories and select the categories you want to include on the DO.
or
Clear the check box to not include this filter for use on the DO.
- 13. (Optional) Click the Display All Categories check box to automatically show all categories in the LearnCenter.
or
Clear the check box to show only certain categories in the LearnCenter. (Default.)
- Click Insert Categories to select categories to include.
- Click Next.
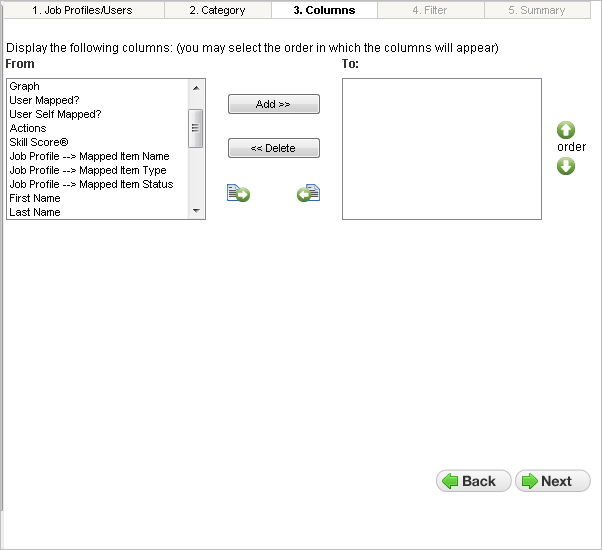
- Indicate which columns to display to Users by moving those columns in the From box to the To box. You can double-click the items in the From box, or click an item and then click the right arrow, or click Move List to move all columns in the From box to the To box.

|
The more columns you include, the slower the software performance will be. |
- Click Next.
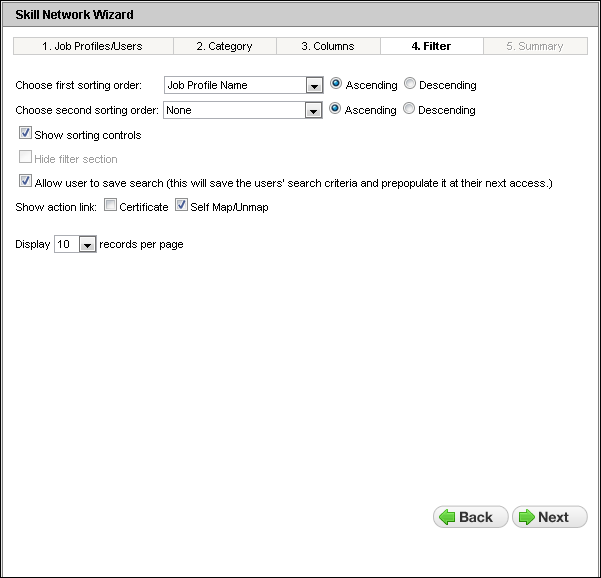
- Indicate how you would like the Job Profiles to sort on the page by selecting one item from the Choose first sorting order drop-down list. This list contains the column names you selected in Step 3 of the Wizard.
- Click one of the following options:
- Ascending - to sort the list in an ascending manner.
- Descending - to sort the list in a descending manner.
- (Optional) Indicate a second level of sorting by selecting one item from the Choose second sorting order drop-down list.
- Click one of the following options:
- Ascending - to sort the list in an ascending manner.
- Descending - to sort the list in a descending manner.
- Click the Show sorting controls check box to indicate you want the sorting controls to be displayed for Users to sort items for themselves. (Default)
or
Clear the check box to hide the sorting controls from view.
- Click the Allow User to Save Search check box to enable Users to save their search for use the next time they visit this DO. The next time Users visit the page containing the DO, it will display to them using the search criteria they last entered. (Default)
or
Clear the check box if you want Users to re-enter search criteria the next time they visit the page containing this DO.
- Click the Certificate check box to display the certificate icon in the Actions column to Users.
or
Clear the check box to hide the certificate icon in the Actions column. (Default)
- Click the Self Map/Unmap check box to provide Users with the ability to self map to or self unmap from Job Profiles in the Actions column. (Default)
or
Clear the check box to hide the ability to self map to or self unmap from Job Profiles in the Actions column.
- Select a number from the Display [x] records per page drop-down list to indicate how many Job Profiles you want to display per page. The default is 10.
- Click Next. The summary of your selections displays.
- Click Return Selected.
- Click Return Selected to submit your selections and add the dynamic object to the LearnCenter page.
- On the WYSIWYG tool bar, click
 .
.
- Click
 to review how your selections will appear to Users.
What User See
Depending on your selections using the Wizard, the DO displays to users on the selected LearnCenter page similar to the following examples.
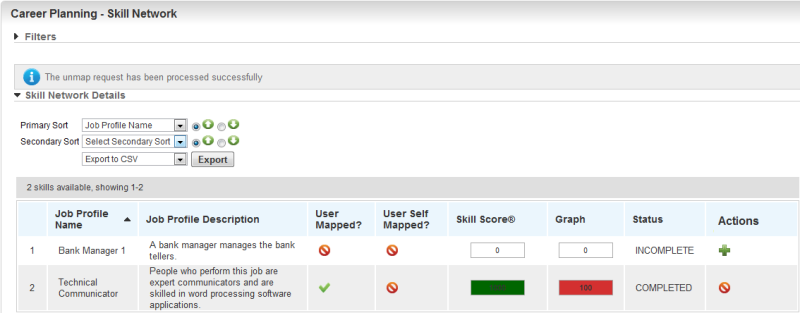
In this example, the Admin enabled the Filter panel. Notice the custom field also displays as a column. This is indicated by an asterisk (*) next to the column title. Users can click the icon in the Action column to either map or remove themselves from the profile. The icon only displays if the job profile was set up to allow users to self-assign and self-remove.
If the Admin indicated that supervisors should approve all additions and removals communication message is then sent to the user's supervisor (if the Admin indicated that supervisors should approve requests).

The Supervisor can click the link to approve or decline the action. The supervisor does not need to log in to LearnCenter to approve or decline the request.
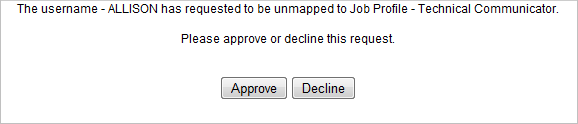
Click Approve to approve the request or Decline to decline the request. Depending on which button you click, the appropriate communication message is sent to the requesting User.

 Related Topics

Copyright © 2010-2018, Oracle and/or its affiliates. All rights reserved.