 on the ILT
menu to expand it.
on the ILT
menu to expand it.You can search for specific Sessions for ILT Event Tracks. The more fields you complete, the more specific your search results will be. Try using less information for a broader search. On the ControlPanel:
on the ILT
menu to expand it.

|
If you click Reset, all the fields are populated with the default values your System Administrator set in the Configuration Options page. In addition, when a different Administrator navigates to the ILT Event/Track/Sessions page for the first time, all the fields are populated with the default values the System Administrator set in the Configuration Options page. |
|
|
To narrow the date range to a single day, put the same date in both the Start Date and End Date fields. To display all records that start after a specific date, select that date in the Start Date field and leave the End Date field blank. To display all records that ended by a specific date, select that date in the End Date field and leave the Start Date field blank. If the Start Date is greater than the End Date, an Invalid Date Range message displays. |
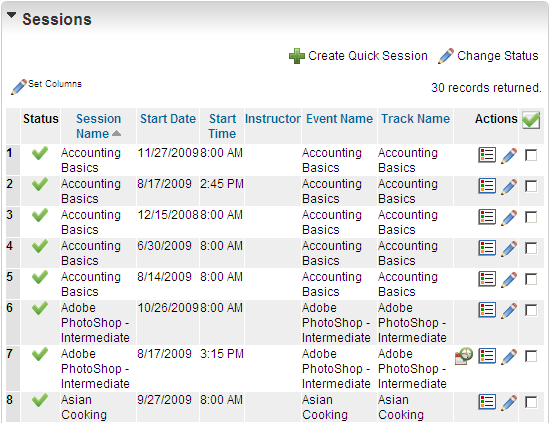
All available Sessions display. In the example above, the Admin selected Both from the Status drop-down, so both Active and Inactive Sessions display. The Admin also selected 10 as the number of records she wanted to display, but since there are more than 10 results, the paging buttons ( ) display to indicate that you can page forward or backward through the list of results.
| Button | Description |
|---|---|
|
|
Indicates the Session is Active. |
|
|
Indicates the Session is Inactive. |
|
|
Click this to view Parent Recurrences. |
|
|
Click this to view Child Recurrences. |
|
|
Click this to edit the Session properties. |
|
|
Click this to edit the Session information. The Session Information page opens and you can make your changes there. Click |
|
|
Click this to change the status of the Session. Select the check box beside each Session you want to change, then click Change Status. If the Session was Active, this action makes it Inactive, or deactivates it. If the Session was Inactive, this action makes it Active. Note: If you selected Both for the Status drop-down list in the Filters section, this option is hidden so that you do not accidentally change a status. Note: If you deactivate a Session, associated Enrollments for that Session are deleted. Enrollments are not deleted when the Event or Track is deactivated. |

Copyright © 2010-2018, Oracle and/or its affiliates. All rights reserved.


 to save your changes.
 Related Topics
 See Also