 on the LearnCenter Design
menu to expand it.
on the LearnCenter Design
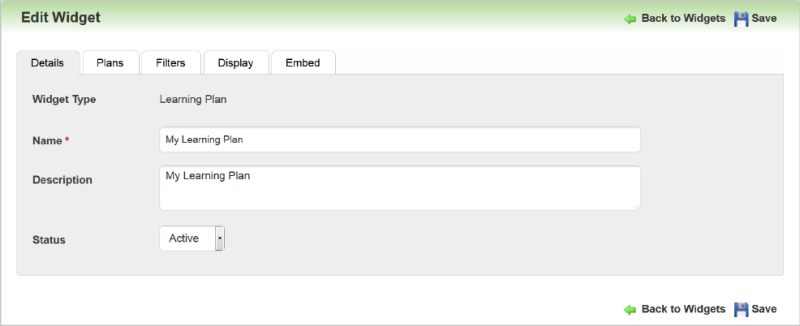
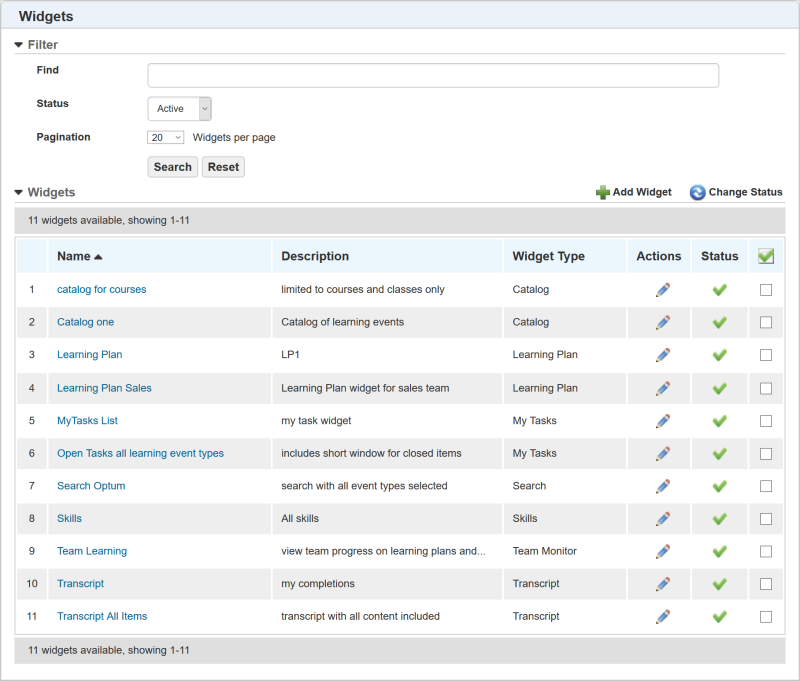
menu to expand it.LearnCenter provides you with standard Widgets that you can then customize and rename. To add a custom Learning Plan Widget, do the following. On the Control Panel:
on the LearnCenter Design
menu to expand it.
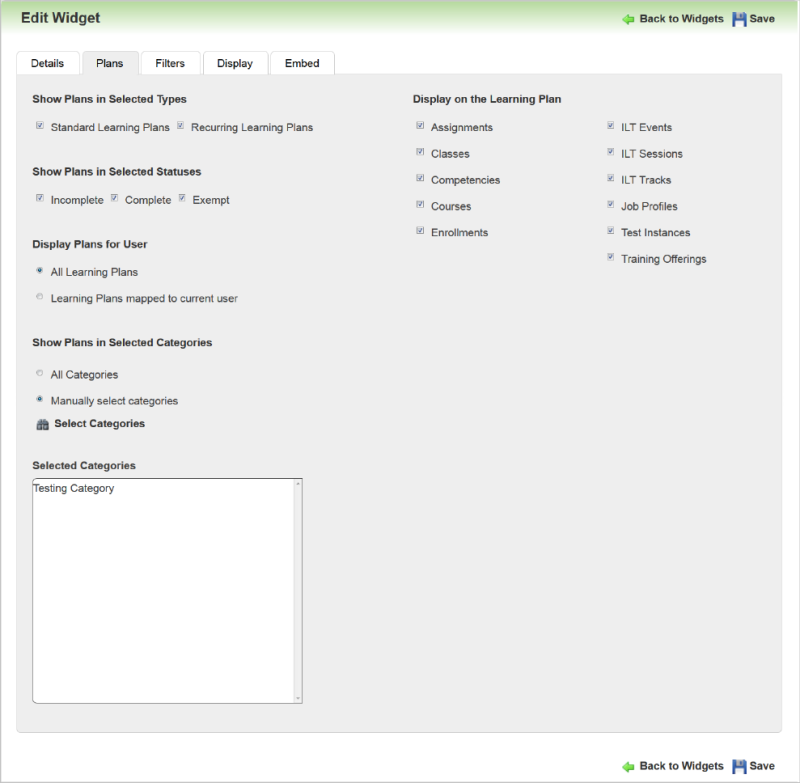
Select or clear the check boxes in the Display on the Learning Plan section to indicate items you want to display on or hide from Learning Plans Widgets. For example, if you do not want to display Job Profiles on the Widget, you can remove it from view by clearing the Job Profiles check box.
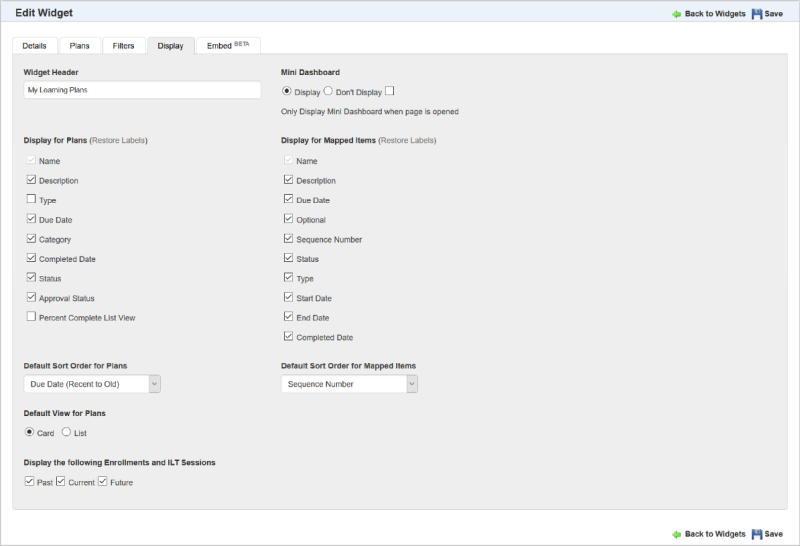
Select the Only Display Mini Dashboard when page is opened check box to only display the Mini Dashboard when the Widget page opens. You may prefer to show only the mini dashboard if you have a lot of content on the page where the Widget resides. Selecting any dashboard metric expands the Widget to display the appropriate results. Selecting the metric again collapses the Widget and displays only the mini dashboard.
or
Clear the check box to display the entire Widget when the page opens. (Default)

|
Select the Percent Complete check box to display the Percent Complete column (in the List View) or field (in the Card View) on the Widget. Clear the check box to hide it. You might decide to hide Percent Complete if you want to refine the List View page layout, or because Percent Complete only applies to certain item types. |
 . A field displays and you can type something else for the label. If you want to return the label to the original default text, click Restore Label. Click the check icon to accept the change, or click the x icon to start over. You cannot change the label for Name and Description.. A field displays and you can type a new name for the label. If you want to return the label to the original default text, click Restore Label. Click the check icon to accept or the x icon to start over. You cannot change the label for Name and Description.

|
If none of the check boxes are selected, LearnCenter displays Past, Current, and Future Enrollments and ILT sessions, just as if all check boxes were selected. Selecting these check boxes applies to Enrollments and ILT Sessions within ILT Track and Event containers.If all the Enrollments/ILTSessions are filtered out, LearnCenter displays the Event and Track, but no Sessions or Enrollments are listed under the Track. |
Once you have created Learning Plan Widgets, you can add them to either Page Templates or Pages. They display to Users like the example below.
For Learning Plan Widgets, Users have the ability to access details for all Learning Event Types, Categories and Credits. They can also leave Ratings and Reviews if you have activated that feature.Clicking a Learning Plan name lists all the events for the plan. Click an event name to view the details of the event.
In full page mode, you have the option of viewing Widgets in list view or card view by clicking one of the two buttons at the top of the page. Card design is similar to the first example of the Widget above.

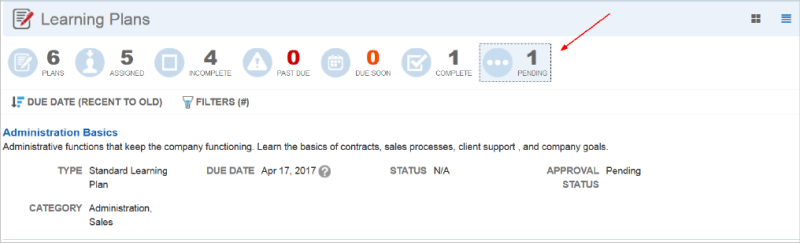
Selecting any dashboard metric,displays appropriate results. In the example below, the User selected Pending.
Selecting the metric again will collapse the list, displaying mini dashboard only.

To see all results, select a different quick filter.
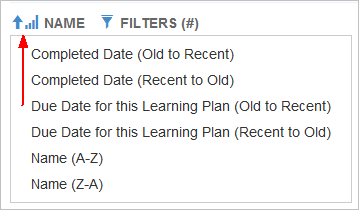
Click the sorting icon to display a menu of sorting options.
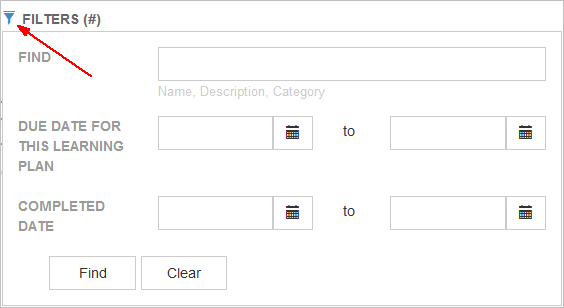
Click the filters icon to display filter options.
Users with supporting browsers can also upload file attachments using drag-and-drop functionality. You can drag files from your computer to the Drag Document Here box next to My Attachments on the Widget pages that accept attachments.
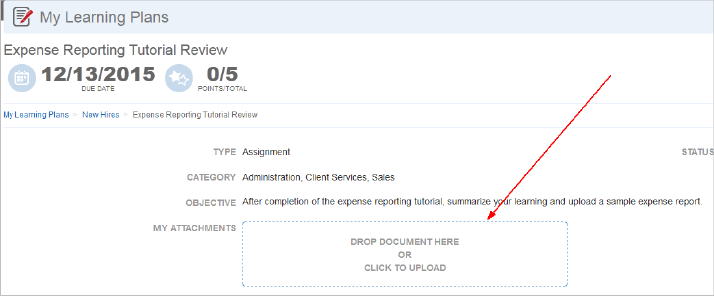
Simply click the box itself to open a Browse window. From there, you navigate to and double-click the item you want to upload.
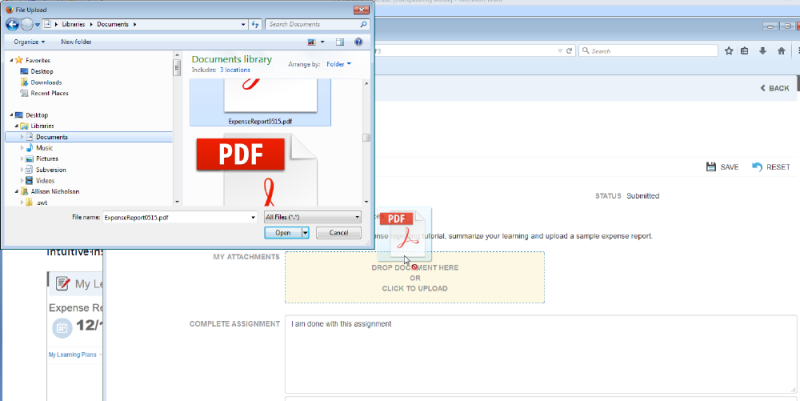
When the box changes to a shaded box, release the file and the upload begins. Alternatively, you can open a Browse window in a separate browser window, drag a file from that window, and drop it into the Upload box. (If you are using Google Chrome, you can click the box, and then drag and drop a file from that Browse window to the Upload box).
|
|
The ability to upload and download attachments while using a mobile device may be limited and is specific to the device and its operating system. |
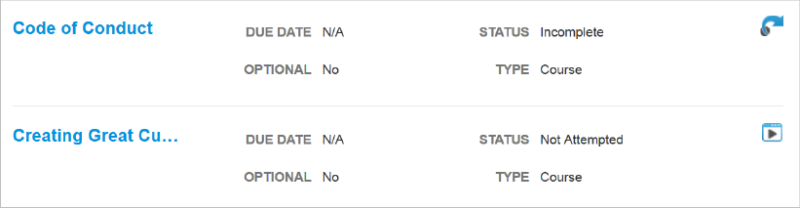
Users have the ability to access details of Enrollments, Courses, Classes, Assignments, Assessments, Training Offerings, and ILT Events, Tracks and Sessions. Clicking the Learning Plan name lists all the events for the plan. Click an event name to view the details of the event.
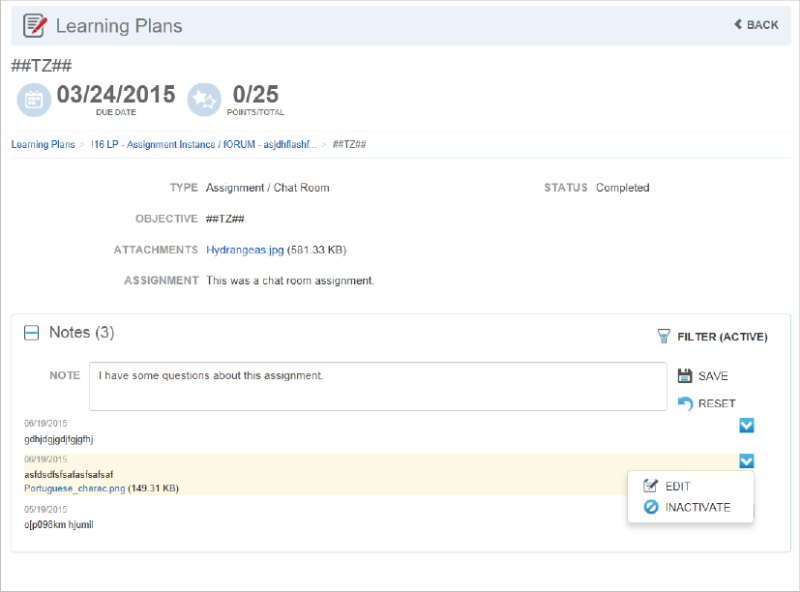
Users can add Notes to Assignments and Enrollments that are mapped to Learning Plans. They can type up to 4000 characters in the Note field. You cannot save an empty Note.
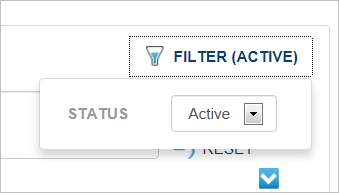
They can also edit notes, or change their statuses. Notes can have a status of Active or Inactive. Inactive notes are not visible to anyone other than their author. Use the Filter icon to alternate views between Active and Inactive Notes.
If they have more Notes than are visible on the page, a Load More link appears beneath the Notes. Click it to display more notes on the page.
Pop-up confirmation messages display directly on the page.
Alerts are color coded:
Users can self-map to Learning Plans from Widgets.
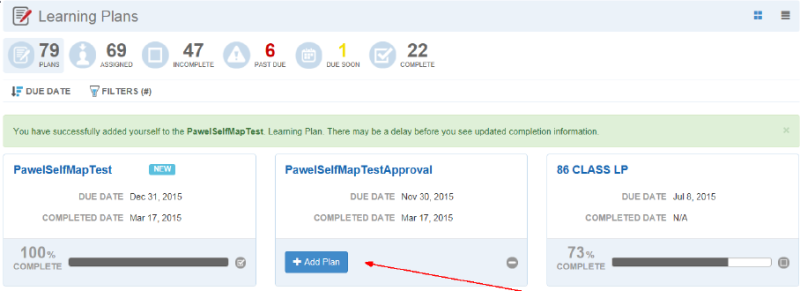
Click Add Plan to self-map to a Learning Plan.
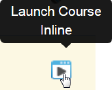
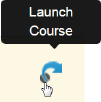
Users can launch Courses and Assessments from Learning Plans on the Widget.
When a Course is available for viewing on a Widget, one fo two play icons are visible on the page. The LearnCenter Course Player launch icon looks like this: , and launches Courses inline (embedded on the same page you are viewing, instead of opening in a new browser window) with the Widget. A tool tip displays when you rest your pointer on (“mouse over”) the icon.
The LearnCenter Course Player launches for single SCO, SCORM 1.2 Courses. See LearnCenter Course Player for further details.
The Classic Course Player icon looks like this:![]() , and launches the Course in a new browser window. A tool tip displays when you rest your pointer on the icon.
, and launches the Course in a new browser window. A tool tip displays when you rest your pointer on the icon.
AICC, LearnCenter WYSIWYG Courses, or SCORM 2004 Classes launch using the Classic Course Player.
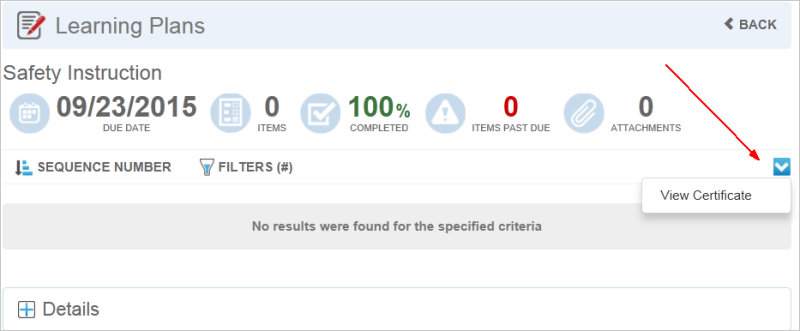
An optional icon (![]() ) only displays if there is a valid option for a Learning Plan, such as when there is a Certificate available to view or print. This icon has also been removed from the multi-row Learning Plans displays, except where a Certificate exists and may be printed.
) only displays if there is a valid option for a Learning Plan, such as when there is a Certificate available to view or print. This icon has also been removed from the multi-row Learning Plans displays, except where a Certificate exists and may be printed.
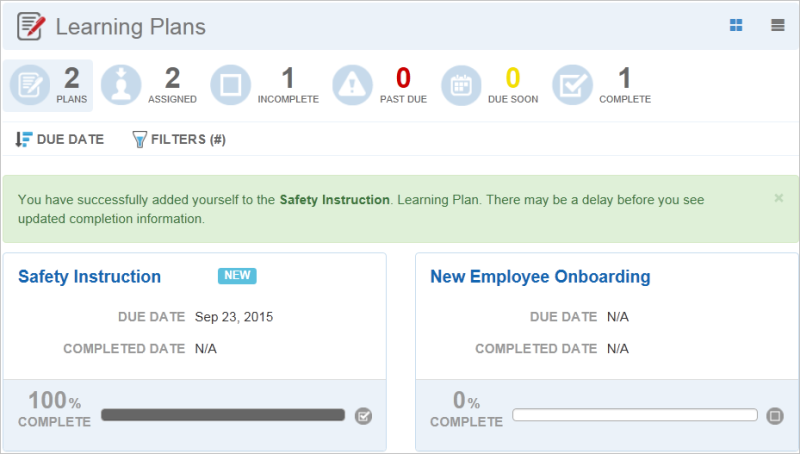
The Dashboard is the line of information at the top of the Widget. The number of all available Learning Plans that the current User could map to (whether they are currently mapped to the User or not) displays under Plans. In order for a Learning Plan to be considered as part of the total count for Plans, Users must be able to self-map to it. (This means you must select the Allow users to add themselves to this Learning Plan check box on the Options tab when setting up a Learning Plan.) The Incomplete Count includes only those Learning Plans that are mapped to the current User. Only Learning Plans that are mapped to the current User are considered for inclusion for Due Soon.

In the example below, there are two possible Learning Plans available for the current User, so Plans displays "2". However, one Learning Plan is already mapped to the current User. Therefore both Assigned and Incomplete display "1".
Percent Complete calculation is based on the number of required items plus the minimum number of optional items, as indicated by the Admin in the Minimum Optional Items field on the Options tab during Learning Plan Widget setup. If a Learning Plan has only optional items, and there is no minimum number of optional items set for the plan, no percentage will be displayed.

Copyright © 2010-2018, Oracle and/or its affiliates. All rights reserved.
 Related Topics