 on the LearnCenter Design
menu to expand it.
on the LearnCenter Design
menu to expand it.LearnCenter provides you with standard Widgets that you can then customize and rename. Use this Widget to provide Users with the history and details of their completed training.To add a custom Transcript Widget, do the following. On the Control Panel:
on the LearnCenter Design
menu to expand it.
![]()
![]()

|
See Multiple Attempts for information on how this feature works. |
![]()
|
|
See Creditsfor information on how this feature works. |
![]()
Select the Only Display Mini Dashboard when page is opened check box to only display the Mini Dashboard when the Widget page opens. You may prefer to show only the mini dashboard if you have a lot of content on the page where the Widget resides. Selecting any dashboard metric expands the Widget to display the appropriate results. Selecting the metric again collapses the Widget and displays only the mini dashboard.
or
Clear the check box to display the entire Widget when the page opens. (Default)
Determine the sort order of the results by selecting it from the Default Sort Order drop-down list.
Indicate which labels you want to display on or hide from the transcript by selecting or clearing the check boxes under Display for Transcript. You can also customize some of these labels by selecting the  icon next to the label. A field opens for editing. Type your changes and click
  to save or
  to cancel. You can always restore the default label text by clicking Restore Labels, which becomes available for selection once you have changed any of the labels. You cannot change the label for Name and Description.
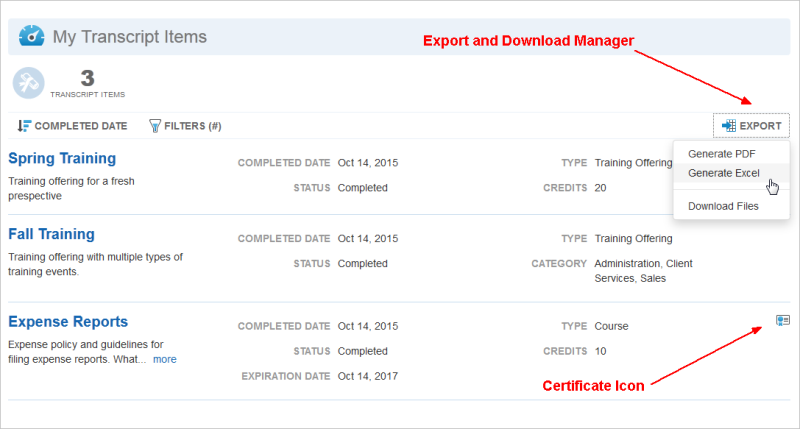
Once you have created Transcript Widgets, you can add them to either Page Templates or Pages. Below is an example of a Transcript Widget as it displays to end Users.
![]()
Items are shown in a multi-row format, and you can click the header for each item and see further details.

|
The Transcript count in the mini dashboard at the top of the page may not always match the number of rows displayed. The number is based on what was selected for the Count for Dashboard Summary option during the Widget setup. If the list is filtered after opening (for example by a date range or by a specific learning event type) the number of listed items may be less than the count. The count is not updated based on filtering. The count is the total based on the Widget setup option. |
![]()
You can also sort the page by Completed Date, either Recent to Old or Old to Recent. The Transcript Widget only displays Completed and Exempt items.
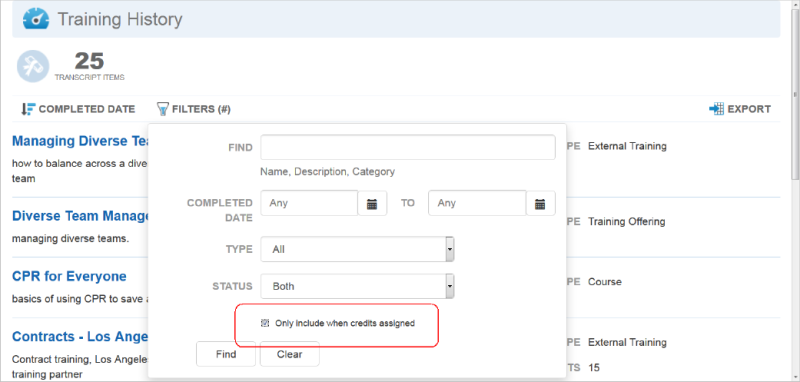
Users can click Filters to view a subset of the transcript results on the page. The filters available to end Users depend on what filters you enabled on the Filters tab during Widget setup.
|
|
The Transcript Widget page is sorted by Completed date, and there is a Widget filter to include all history, last year to date, and current year to date on the display. (This is an option on the Content tab of the Widget wizard.) Since learning events with status Exempt do not have a completed date, there are some things to consider:
|
Users can click the Certificate icon to view and print certificates. They also have the ability to export the entire transcript to either PDF or Microsoft Excel format. The content of the exported transcript is based on the current sort order and selected filters.
|
|
The Transcript Widget only displays External Training items if:
And
|
If Users click Download Files from the Export drop-down, a download manager window opens. You have several options for PDF, including Transcript with Credits. This option produces a list of completed training events within Admin-specified filters in a formatted, multi-row layout complete with company logo. If any earned Credits are associated with completed events, the Credit names and values display (otherwise the value in the Credits column is 0). You can further refine this PDF by selecting the Only include when credits assigned check box located on the window that opens when you click the Filters icon on the Transcript Widget page.
When you do this and regenerate the report, the PDF only displays completed items that have earned Credits.
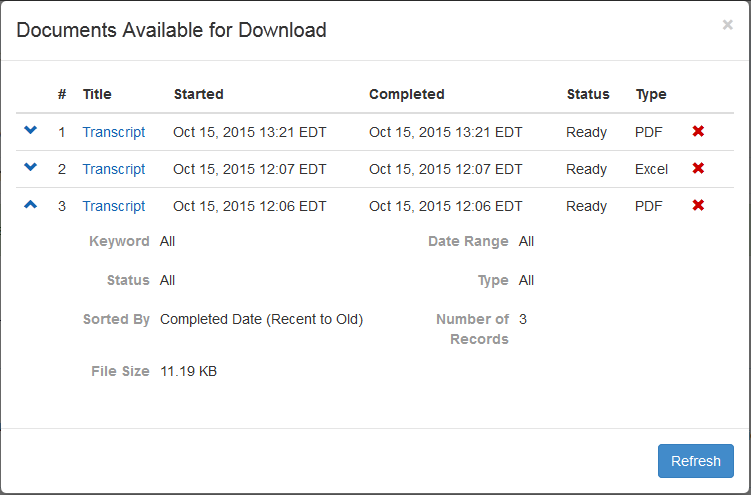
This window lets you check the status of the export. It also displays the last three versions of each download type so that Users can quickly access their last few transcript exports. Information about the filter and sort options for each exported transcript in the list can be accessed by clicking  . To open an exported transcript, click the Transcript link next to the item you want.
![]()
The exported files are based on your current sorting and filtering.
|
|
The default Oracle company logo displayed at the top of the Transcript output can be changed to your company’s logo or some other logo of your choice. Contact Customer Support through My Oracle Support to open a service request to make this change. (Note: If you have already had the logo changed for BI Reporting reports, the same logo will be used for Transcripts. |

Copyright © 2010-2018, Oracle and/or its affiliates. All rights reserved.
 Related Topics