BI Desktop Publisher Add-In
BIP Desktop Publisher is an advanced customization tool that enables you to do advanced layout customizations for your reports using Microsoft® Word® to create an RTF layout file. In the RTF file, you can create calculations, summary fields, groupings and more. You can also include Microsoft® Word® charts and graphs on reports. Advanced customizations using this tool can only be performed on custom reports.

|
Note: This is an optional, free tool that you can download. BI Reporting Desktop is not required to use BI Reporting in LearnCenter.
In addition to the BI Publisher Desktop specific documentation that comes standard with the tool, Oracle Learn Cloud has provided you with simple instructions for using BI Publisher Desktop with LearnCenter . Oracle Learn Cloud Support is available should you need assistance with downloading sample data files or uploading files back to LearnCenter. For questions about using Microsoft® Word® to format your files, refer to Microsoft® Word® online help.
|
The basic workflow for downloading and using this tool is:
- Download and install the BI Publisher Desktop. (Instructions provided in the following section.)
- In LearnCenter, run the report you want at least one time. This enables the Modify Layout option, and you can proceed to the next steps.
- Download the sample data file in .XML format from LearnCenter.
- Import the sample data into Microsoft® Word®.
- Create the layout file in Microsoft® Word®.
- Save the Microsoft® Word® layout file document as an .RTF.
- Upload the .RTF to LearnCenter.
Downloading the Free Add-In
To obtain the free tool, do the following:
- Visit: http://www.oracle.com/technetwork/middleware/bi-publisher/downloads/index.html.
- Sign in using your Oracle credentials if you already have one.
Or
Sign up and create an Oracle account if you do not already have one.

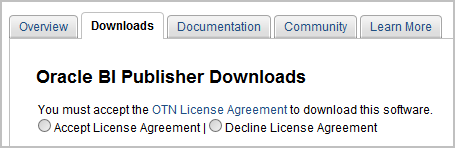
- Click the Accept License Agreement option under BI Publisher Downloads.
- 4. Scroll down to locate Oracle BI Publisher 11g Enterprise 11.1.1.9.0.
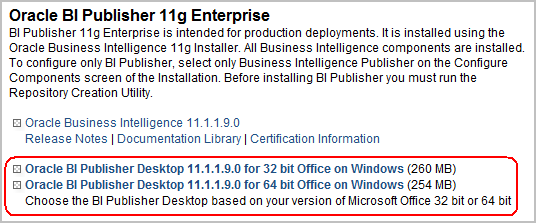
- 5. Click the hyperlink for the appropriate version for your computer; either 32 bit or 64 bit.
|
|
If you are running 32 bit Microsoft® Office®, select 32 bit. If you are running 64-bit Office, select 64 bit. If you do not know what version you are running, check the properties of any Microsoft Office program on your computer.
Important: If you are running Microsoft Office 2010, you must select 32 bit.
|
-
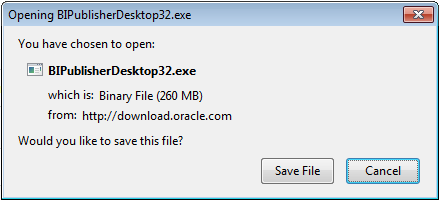
Click Save File.
-
Double-click the file to begin the installation of either BIPublisherDesktop64.exe or BIPublisherDesktop32.exe (depending on which version you selected).
-
Follow prompts to install the software.
- Once installed, a Microsoft® Word® document automatically opens containing documentation for BI Publisher Desktop. (Note that these were written for BI Publisher Desktop, but not the Learn product specifically.) If the software installed correctly, you will notice the new BI Publisher ribbon in Microsoft® Word®.
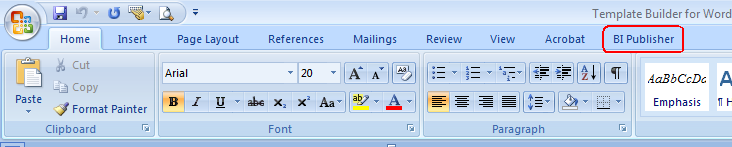
- Click it to view the new menu.
BI Publisher also created a new folder on your computer: "C:\Program Files (x86)\Oracle\BI Publisher\BI Publisher Desktop. Additional documentation for BI Publisher Desktop has been placed in a folder here.
Downloading the Sample Data File
Before you can create a custom layout file for a report, you must generate some sample data for that report. Follow these simple steps to generate and download the sample data file in .XML format.
- In LearnCenter, run the custom report for which you want to design the layout at least one time. This makes the Modify Layout option become available from the report’s action menu.
|
|
Important: This menu is only available after you have run a custom report at least one time. |

- Click Modify Layout.
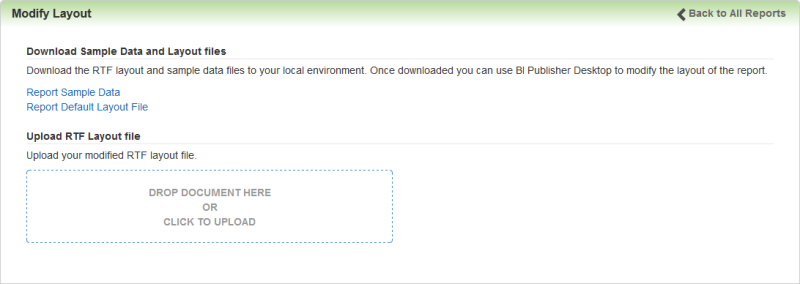
- Click the Report Sample Data link, and then follow the instructions for your browser to download the sample data file.
|
|
Note: Do not click Report Default Layout File. You do not need to download the RTF layout file template prior to bringing the sample data into the BI Publisher Microsoft® Word® add-in. |
What is downloaded is a generic layout file (a simple table based on our current tabular outputs to date). This template contains no field data. It is presented here should you want to continue the layout we have introduced. You can now import the file into Microsoft® Word®.
Importing the Sample Data File into Microsoft® Word®
Once you have downloaded the sample data file for a custom report, you can import it into Microsoft® Word® and begin customizing the layout.
- Open Microsoft® Word®.
- Click the BI Publisher tab.
- Click Sample XML on the Microsoft® Word® ribbon.
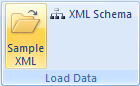
- Browse to the location where you saved the sample data file, select it, and click Open.
|
|
Hint: Your file will have a name based on this naming convention: <report name>-<date/time stamp>_sampledata.xml. For example: CustomCourseReport-201510271102_sampledata.xml. |
Once imported, the following message appears.
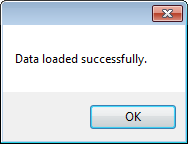
- Click OK.
|
|
Note: If the file does not import correctly, contact Customer Support to open a service request, and include your sample data file with the request. |
- Design the layout for the report using Microsoft® Word®, and save the file as an .RTF. When you are finished, upload the RTF back to LearnCenter.
Uploading the RTF to the LearnCenter
Once you have designed the layout file to meet your needs, upload the file back to the report in LearnCenter.
- Open LearnCenter, and then navigate to the My Reports folder on the BI Reporting page in the Control Panel.
- Locate the custom report you created the file for and click Modify Layout from the Actions menu.
- On the Modify Layout page, either drag the RTF file on to the Drop Document Here or Click to Upload box, or click the Drop Document Here or Click to Upload box to open a browse window, browse to and select the RTF file. The Drop Document Here or Click to Upload box is replaced by an upload progress bar.
When the upload is complete, the Drop Document Here or Click to Upload box returns, along with a link to the RTF layout file. Your report will now use your custom layout each time it is run (whether ad-hoc or scheduled).
- Click Back to All Reports to return to BI Reporting main page to run your report.
Once you upload the file, the following changes take place for that report:
- The Edit Report option becomes disabled. This prevents you from potentially changing the data model that is now encapsulated in the RTF. If you need to use the Edit Report option, you must first restore the report to its original layout by removing the custom .RTF (Instructions below).
- The Fields tab on the build/schedule workflow will be hidden (RTF layouts have "hardcoded" columns).
- You cannot use the Interactive output type. That option will be disabled for these reports. If it was selected prior to uploading a custom RTF file, then the default option becomes PDF output.
Restoring the Report to the Original Layout
If you decide you n longer want to use the custom layout with the report, you can easily restore the report layout back to its original settings.
- Open LearnCenter, and then navigate to the My Reports folder on the BI Reporting page in the Control Panel.
- Locate the custom report.
- Click Modify Layout from the Actions menu.
- Click Restore Default Layout.
 Related Topics

Copyright © 2010-2018, Oracle and/or its affiliates. All rights reserved.