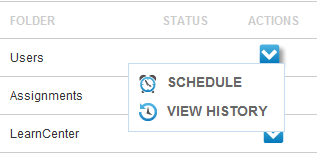
 on the Reports menu to expand it.
 in the Action column for the report. A menu opens.
You can schedule reports to automatically generate at some date in the future, or to have it run at certain intervals. For example, perhaps you want to generate the Assignment Report on the last Friday of every month. You can also automatically upload an executed, scheduled reports to the Upload folder or any child folder of the Upload folder of your SFTP server. This enables you to streamline any post-processing workflows you might have in place. To schedule a report, do the following. On the Control Panel:
on the Reports menu to expand it. in the Action column for the report. A menu opens.
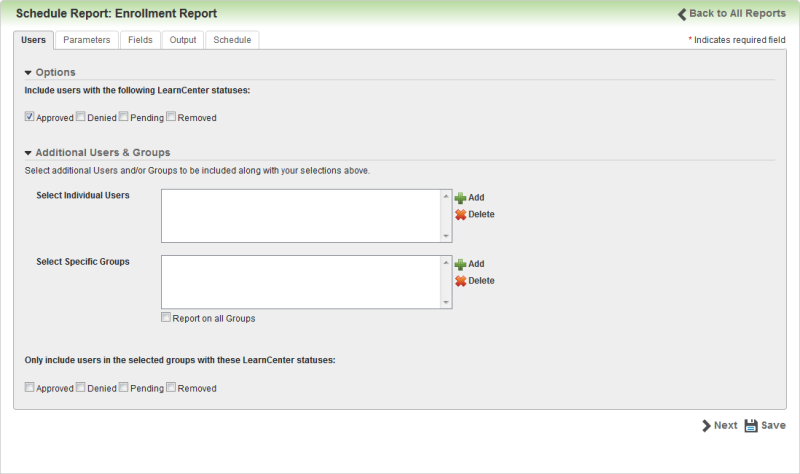
The number of tabs available depends on the type of report you selected. Reports that do not have options for Users will not have a Users tab.

|
BI Reporting Standard Report results only show mapped Users. Regardless of what Users you select on a report, you will only see those Users mapped to the items in the results. |
The Fields tab allows you to select from the fields that are available on the report you selected. When you first visit this page for any report, the Use the default fields for the report check box is checked by default and the Fields and Results Sort Order selections are dimmed (gray). The fields in the list boxes on the right side of the page list the pre-selected (default) fields and sort orders for the report. You can build the report as is, or you can clear the Use the default fields for the report check box to select the fields and sort order that suit your needs. Once you make changes, the report is considered a custom report.
|
|
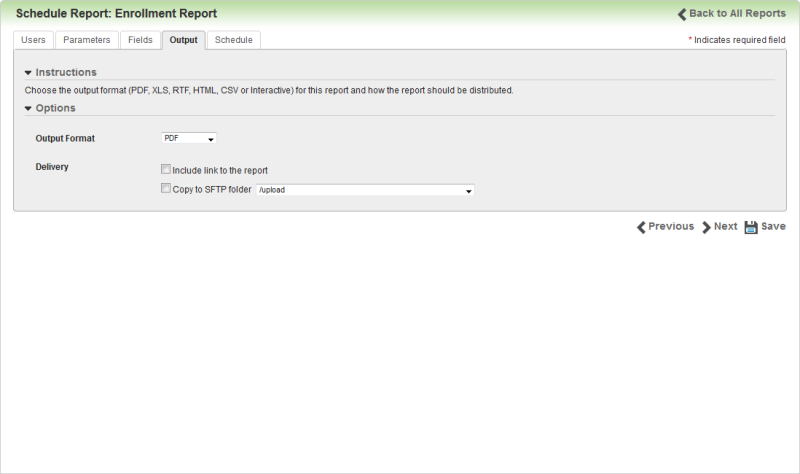
Best Practice Tip: If you plan to use all fields in your report output, particularly with the reports that have a lot of available fields, it is recommended that you select XLS as the output, because you will be able to manipulate the size and spacing of the columns using Microsoft® Excel. You cannot manipulate or edit the outputs results for PDF, RTF, HTML files or CSV. With Interactive HTML, you can manipulate sorting and sizing in a similar manner as XLS files. The BI Reporting .CSV file format does not use any custom layout files. It will always return the columns selected for the report. |

|
As a Beta release, BI Reporting reports are limited to 65000 records. However, your chosen output format might have additional limitations. For example, if you include too many fields or rows of data in your output, and you reach the Microsoft® Excel spreadsheet data limit, your report data will be truncated. When generating PDF output, BI Reporting does not limit the size of the output file. However, when the size of the file approaches 2 GB, Adobe® Acrobat® Reader may no longer be able to open or handle the file. This is an Adobe limitation. When selecting the Interactive output, the complete data set that is passed to the layout should be limited to several thousand rows to achieve a responsive report. |
|
|
No report attachments will be emailed to you. You will have access to your report online for up to 90 days. This eliminates the possibility you might not receive an email with a report attachment due to file size restrictions or security rules that are put in place for your network or email system. All Users will be forced to log in to LearnCenter if you click a hyperlink to a report in an email. This ensures that only authorized Users of your LearnCenter can view reports. The LearnCenter SSO feature will work with this authentication. This security is enabled for all LearnCenters.This security can be disabled. Contact Customer Support through My Oracle Support, and open an SR requesting this functionality to be disabled. |
|
|
Use of this field enables you to streamline additional post-processing workflows you might have in place. In addition, if you use this with the CSV output, saving to an SFTP folder helps to automate report data into third party integrations or operations.Interactive and HTML outputs are not available for uploading to the SFTP server. Important: If someone deletes the SFTP folder, the report is still accessible from the Last Run link on the BI Reporting main page and it can still be run, but it will not be copied to the SFTP folder since it no longer exists. |
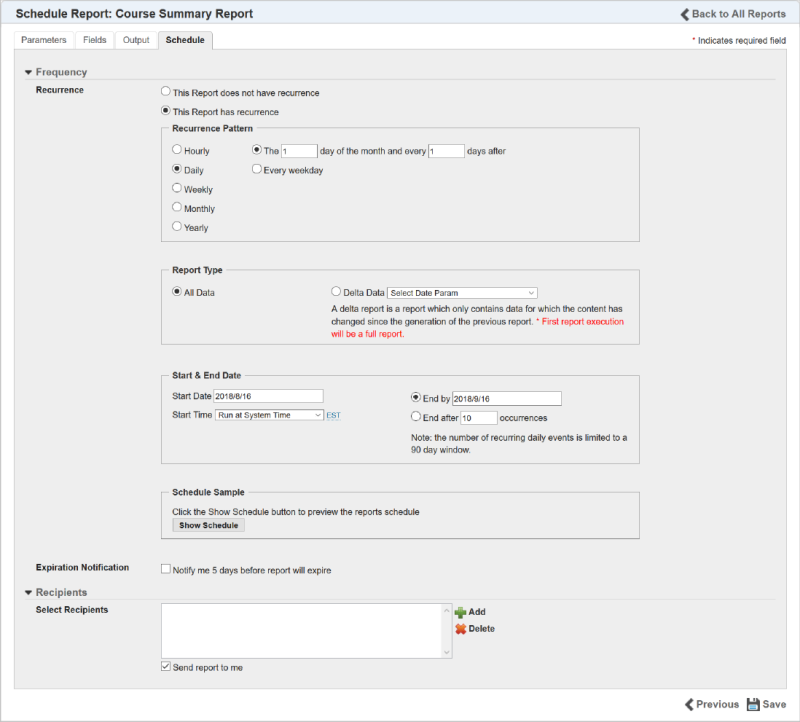
The remaining fields in this section vary depending on which option you selected.
|
|
You cannot schedule report recurrences for dates in the past. A warning message will display to alert you if you have done this. The End By date must be at least 1 day greater than the current date. |
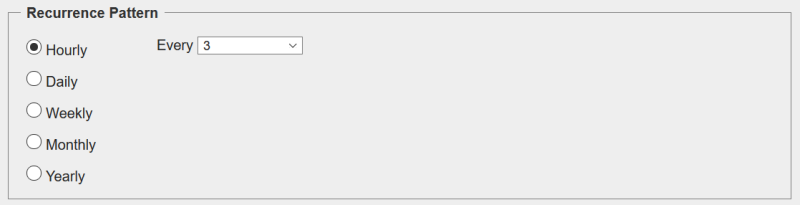
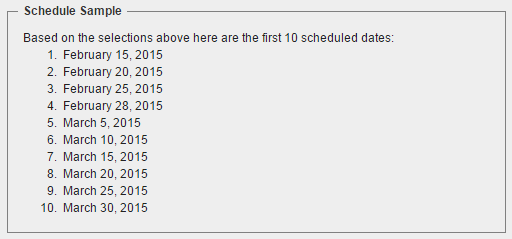
If you selected Hourly, select a number from 1 to 23 from the drop-down list. If you want the report to run every 3 hours, select 3. If you want the report to run every 12 hours, select 12.
Or
If you selected Daily, do one of the following:

Note that the default for both fields is 1, which means that you want the report will run every day starting on the first day of the month. If you want this report to run on the 15th day of the month and every 5 days after that, you would enter "15" and "5" in these two boxes, respectively.
Or
If you selected Weekly , you can then select which days of the week you want the reports to generate.

Or

If you selected Monthly, you can also indicate the Day of the month you want the report to run. (The default is 1 to indicate the first day of the month.) You can also have it run every 1 Months (default) or every x number of months after the first run. For example, if you want to run this report on Day 1 of every 3 Months, you would enter 1 and 3 in the boxes, respectively.
Or

If you select Yearly, you can indicate the month and day on which you want the report to run.

The options in this section work in conjunction with the any of the recurrence patterns.The report types are:
|
|
If a delta report skips for any reason on one occurrence (the queue was full, a system error, etc.), but runs on the next occurrence, all of the delta data from the skipped report is included in the next report. |
You can choose a data view and parameter from the Delta Data drop-down list to use as the basis for your delta reports. The data views and parameters in this list come directly from the data view selections in your report.
|
|
You can use date-only parameters for Daily, Weekly, Monthly and Yearly recurrence patterns. Date-only parameters are visible, but unavailable for selection if you select Hourly as the Recurrence Pattern. Hire Date is an example of a date-only parameter. |

You can choose a Start Date and a Start Time. The Start Time is the time of day that you want report to enter the processing queue. Processing completion times can vary based on the number of other report requests already in the queue, and how much data has been requested.
|
|
The time you select is based on your time zone, unless you select Run at System Time. Selecting Run at System Time means the report will be sent to the queue at 12 AM Eastern Standard Time. This is the default setting for all pre-existing scheduled reports. |
A delta report does not necessarily run on the exact hour it enters the queue, because there may be other reports in the queue ahead of yours. However, LearnCenter does record the time at which the report starts processing. On the next execution of report, LearnCenter takes all of the data between that first execution time and “now” and records the “now” as a new current time. It continues using this rule until the schedule ends. The following is an example scenario of how this rule works with an hourly delta report.
For the End Date, you can have the recurrence run until a specific date, or after a specified number of occurrences for up to a 90 day period. After 90 days, you can simply extend the recurrence. You can use the Notification Expiration check box to indicate that you want to be alerted before the recurrence ends.
|
|
Extending the expiration date for a delta report not cause LearnCenter to start over and send a full report on the first recurrence. Changing any of the other parameters for a delta report will cause LearnCenter to send a full report on the first recurrence. |
Click Save.

Copyright © 2010-2018, Oracle and/or its affiliates. All rights reserved.
 Related Topics