You are here: Reports > Insight Reporting > Using BIRT® Designer Pro with LearnCenter

Using BIRT® Designer Pro with LearnCenter

Insight Reporting will be disabled on January 31, 2016. Please begin using Bi Reporting.

LearnCenter is integrated with Actuate® BIRT® Designer Pro. BIRT  Designer Pro is a stand-alone report development tool that is easy to use, supports extensive customization, and is used to create reusable report components, interactive web reports and dashboards. You can create your own customizable reports using Designer Pro, and then import (or "sync") them to LearnCenter where you can further modify, schedule, or share them with other Users.

For complete information about Designer Pro, visit http://www.actuate.com/products/birt-designers/birt-designer-pro/.

Things You Should Know About This Integration

For this integration:

Basic Designer Pro Terminology

Some Designer Pro terminology is mentioned in this document:

For detailed training and documentation on Designer Pro, refer to the links provided in the section called Things You Should Know About This Integration.

Setup in LearnCenter

Once you have obtained Designer Pro and are ready to begin using it with LearnCenter there are a few setup items to take care of:

Typical Workflow

With this integration, you now have the ability to create and design your own reports in Designer Pro and then import (sync) them to LearnCenter. The following steps outline the typical workflow to create a new report in Designer Pro and import it into your LearnCenter.

These instructions are intended as a guideline. Refer to Designer Pro documentation, Designer Pro online help, and Designer Pro training for a deeper understanding of Designer Pro.

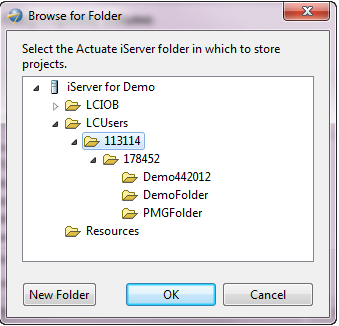
First, create a new project and indicate the Designer Pro folder in which the report will reside.

  1. Open Designer Pro and create a new Project if needed.
  2. Click File > New > Folder. The New Folder window opens.
  3. Select an existing folder from the list.
    or
    Create a new folder by typing the Folder name.
  4. Click Finish. If you created a new folder, it displays on the Navigator tab.

Next, create the new report in Designer Pro.

  1. Click File > New > Report. The New Report window opens.
  2. Select the folder you just created from the list.
  3. Type the File name for the report. You must use the ".rptdesign" extension for the file name. For example, you may call your report "New_Report_3.rptdesign".
  4. Click Next.
  5. Select an available report template. You can preview the design of these templates in Designer Pro. These template designs are not modifiable. Choose one of the following:
  1. Click Finish. The report is created and listed in the folder you indicated.

Next, create a new Data Source.

  1. In the Navigator, select the folder that contains your new report.
  2. Click the Outline tab.
  3. Under your folder, right-click Data Sources, and select New Data Source. The New Data Source window opens.
  4. Select Actuate Information Object Data Source.
  5. Type a Data Source Name.
  6. Click Next. The New Actuate Information Object Connection Profile window opens. At this time you may want to sign in to the appropriate LearnCenter, and navigate to the Insight Reporting Settings page. You will need the information on this page for the following set of steps.
  7. Type the Data Source Connection Properties. Some of this information can be copied and pasted from the LearnCenter Insight Reporting Settings page.

  1. Type (or copy and paste from LearnCenter) the Server URL from the Insight Reporting Settings page.
  2. Type (or copy and paste from LearnCenter) Volume from the Insight Reporting Settings page.
  3. Type (or copy and paste from LearnCenter) User Name from the Insight Reporting Settings page.
  4. Type your LearnCenter Password.

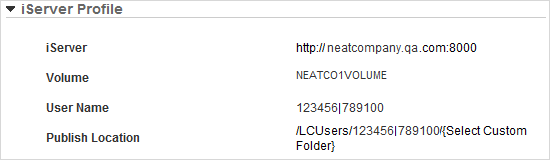
Be sure that you are copying this information from the LearnCenter in which you intend to use this report. Each sub LearnCenter has different information.

  1. Select Yes for Use Logged in user credentials on iServer.
  1. Click Test Connection. If it passes, continue to the next step. If it fails, return to the Insight Reporting Settings page in LearnCenter and determine whether you have properly copied the Server URL and Volume, or determine whether you have correctly typed your username and password. Be sure that you are obtaining this information from the correct sub LearnCenter. Test the connection again. If it passes, continue to the next step. Contact Customer Support through My Oracle Support if you have verified the information has been entered correctly and the connection still fails.
  2. Click OK to close the Success pop-up message.
  3. Click Finish. The new Data Source is created and listed in the Data Source folder.

Next, you will create Data Sets.

  1. On the Outline tab under your report name, right-click Data Sets.
  2. Select New Data Set. The New Data Set window opens.
  3. Type or select the Data Source Selection.
  4. Select the Data Set Type.
  5. Type the Data Set Name.
  6. Click Next.
  7. In the Available Items pane , click LCIOB, and then click Information Objects. The list that displays contains all of the standard .IOBs provided by Taleo Learn. You will use these to design your reports.
  8. Click an .IOB from the Available Items pane, and drag it to the editor pane on the right.
  1. Continue clicking and dragging IOBs to the editor pane until you have all of the IOBs you want.
  2. Make joins and parameter settings as needed, and verify that they are correct.
  3. Click Next. The query is built. If it is successful, no error messages display.
  4. Preview the results by clicking Preview Results in the left pane and then clicking OK.
  5. Click Finish. A summary window opens displaying all of your selections. If needed, you can edit the data set now by clicking Edit.
  6. Your data set is created and listed under selected Data Sets on the Outline tab.

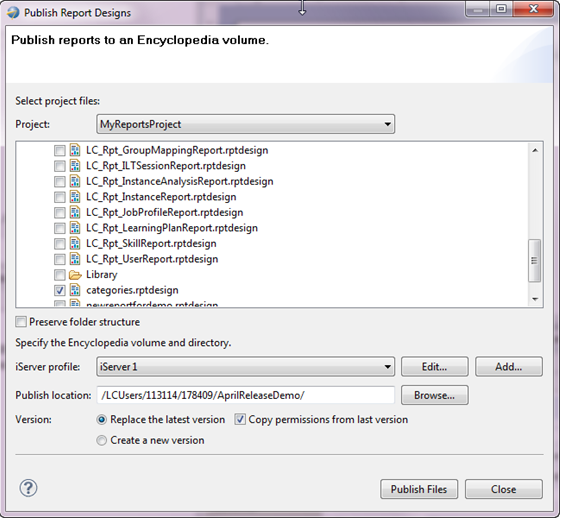
You can now design your report using the Report Designer window in Designer Pro. Refer to Designer Pro online help for step-by-step instructions. When you are ready, publish the report to iServer.

  1. Log in to LearnCenter, navigate to ControlPanel > Reports > Insight Reporting > Custom Reports tab. Ensure that the folder you want to use for your Designer Pro report exists. If it does not, add it now.
  2. Return to Designer Pro, and click File > Publish Report to iServer.

  1. Select iServer Profile from the drop-down list.
  2. Click Browse next to Publish Location. The Browse for Folder window opens.

  1. Under LCUsers, select your UserID (the first 6-digit number from the Username field on the Insight Report Settings page), and then select your LCID the second 6-digit number from the Username field on the Insight Report Settings page).
  2. Under the LCID, select the custom folder you want to use. This is the folder on the LearnCenter Custom Reports tab to which you will sync the report.
  3. Click OK.
  4. Select either Replace the latest version or Create New Version.

Currently Insight Reporting supports multiple versions from iServer if the reports were created using Designer Pro. iServer adds a version number to the end of the report design path. For example, if you create 3 different versions of a report in Designer Pro, they are stored in iServer as:

  • /LCUsers/userId/lcid/report.design;1 Version 1
  • /LCUsers/userId/lcid/report.design;2 Version 2
  • /LCUsers/userId/lcid/report.design;3 Version 3

Currently, in LearnCenter, the multiple versions of a report display in Insight Reporting as the same name repeated. For example:

  • report
  • report
  • report

You will not see any difference in the report names, but each one represents a version in the iServer. When you select Replace the latest version you are replacing the last version of a report design. So in the example reports above, you would be replacing report.design;3 (Version 3).

If you selected Create a new version, you are creating a new version of the report. In the example above, if you publish a new version of the report and select Create a new version, iServer creates report.design;4 (Version 4). In Insight Reporting in LearnCenter, you will see a fourth report of the same name.

  1. Click Publish Files. The report is published and you can now sync the report from iServer within LearnCenter.
  2. In LearnCenter, navigate to ControlPanel > Reports > Insight Reporting > Custom Reports tab.
  3. Sync Report from iServer. The report becomes available on the Custom Reports tab. You can now access, run, customize, and share the report.

Related Topics IconRelated Topics


Copyright © 2010-2015, Oracle and/or its affiliates. All rights reserved.