 on the Options
menu to expand it.
on the Options
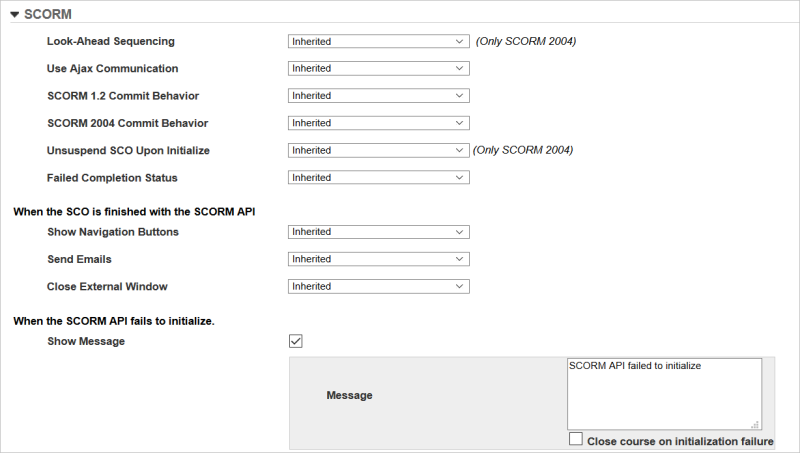
menu to expand it.You can specify the default settings for SCORM courses in your LearnCenter. On the ControlPanel:
 on the Options
menu to expand it.

|
|
Setting Look-Ahead Sequencing to No speeds up navigation from one SCO to another for only SCORM 2004. In addition, setting this field to No allows the user to click on any activity in the TOC and the rules are evaluated at runtime. See Look-Ahead Sequencing for additional information. |
|
|
AJAX Communication allows the LearnCenter to handle network communication issues and prevent race conditions for courses that pass completion and bookmarking related information during the content’s unload event handler. This setting can only be changed on a per LearnCenter basis. See Asynchronous JavaScript - AJAX for additional information. |
|
|
See Flexible Commit for additional information. |
When a Course is launched, and if it was left suspended (paused, later to be resumed) from the last session the User had with it, it would immediately unsuspend it (this is the default [NO]). So for those Courses that require a User to click a link to view the content, the User could simply just click Next and then the suspended information would be lost. Setting this option to Yes will wait until the Course content sends in an Initialize command, and then unsuspend the Course attempt.
|
|
The Navigation Button Tips drop-down list only displays if you are using the Classic Course Player. See Adding Courses with the WYSIWYG Course Editor for additional information. |
|
|
See Adding Courses with the WYSIWYG Course Editor for additional information. |
|
|
See Importing SCORM Content to Your LearnCenter for additional information. |
|
|
See Importing SCORM Content to Your LearnCenter for additional information. |
|
|
This field does not accept HTML Code. The Message field does not display if you do not select the Show Message check box. |
|
|
The Close Course on Initialization Failure check box does not display if you do not select the Enable Course API Failure Message check box. If you select the Close Course on Initialization Failure check box in the Course Options - SCORM panel, you will only see the OK option on the second attempt message box instead of OK and Cancel. See SCORM API Error Messages for additional information. |

Copyright © 2010-2015, Oracle and/or its affiliates. All rights reserved.