Managing Enrollments
The process of managing Enrollments can include tasks such as approving Users’ requests for training, un-enrolling Users, and changing Post-statuses (recording the attendance type after an ILT Session). You may choose to centralize the responsibilities for managing Enrollments by making only certain Admins responsible for managing Enrollments, or you can also decentralize the responsibilities and make various Users, such as Instructors, responsible for managing the Enrollments for the ILT Sessions they deliver.

|
The Users responsible for managing Enrollments need to be designated as Enrollment Administrators and they require Enrollment-related Administrator Permissions to perform their responsibilities. The following User Permissions are required to use the Enrollment features:
- View Management Links (sub permission of Manage Options)
- Manage Enrollments (parent and sub User Permissions)
- Manage Assets/Materials (parent and sub User Permissions)
See User Permissions and Enrollment User Permissions for instructions on granting and denying User Permissions.
|
Most of the management activities can be accessed from the Enrollments page. Before you can perform any of these tasks, you must first locate the Enrollments you want to manage. You do this by using filters and sorts to add a list of Enrollments on the page.
On the ControlPanel:
- Click
 on the Enrollments
menu to expand it.
on the Enrollments
menu to expand it.
- Click
Enrollments.
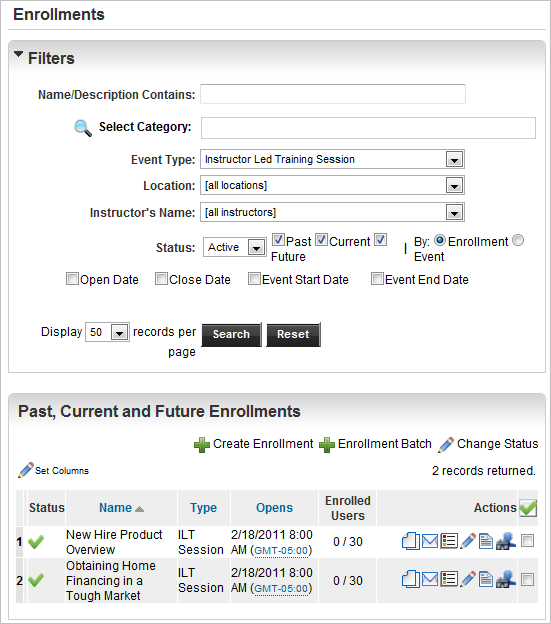
By default, this page remembers your last settings. The number and types of Enrollments and the columns that display when you first open the page reflects your last sort or search. If you collapsed or expanded any of the sections on this page on your last visit, or hid or displayed any columns, when you return to the page, the same settings will be in effect.
You can filter Enrollments by their status (canceled or active). A  in the Status column indicates the Enrollment is Active. A
  indicates the Enrollment is Inactive (canceled).

|
If you do not see the Status column, you can display it by clicking Set Columns, and clicking the Status check box.
|
You can filter Enrollments on the page using the Past, Current, and Future check boxes or the Enrollment or Event option buttons. The following table describes how these fields work together.
| Enrollment
|
Registration closed date is before today's date. |
Today's date in between the registration open and close date. |
Registration open date is after today's date. |
| Event
|
Event end/or stop date is before today's date. |
Today's date is in between event start and end/stop date. Also includes never end date. |
Event start date is after today's date. |

|
By default, Current and Future are selected. If you clear all of the check boxes, no results display when you click Search. The Enrollment option button is selected by default. |
To display all Enrollments available in the LearnCenter, click Show Active Enrollments.
Searching for Enrollments Using Filters
Click to expand the Filters section and search for Enrollments. You can search by one or a combination of any of the filters described below. You can narrow the list of all Enrollments to by using the filters at the top of the page. The fewer filters you use, the broader the search results. The more filters you use, the more narrow the search results. In the Filters section:
- (Optional) Type a portion of the event's name or description in the Name/Description Contains field.
- (Optional) Click Select Category and select a category from the Select Categories window.
- (Optional) Select one of the following from Event Type:
- All Event Types
- Assessment Instance
- Chat Room
- Class
- Forum
- Instructor Led Training Session (this option generates additional field)
- LearnCenter
- Online Course
- Online Synchronous Course
- Self Study
- Virtual Instructor Led Training
- Click Search.
The remaining filters available for use and described below depend on the Event Type you select. If you select All Event Types from the drop-down list, all filters are made available. They also depend on whether items are available to search by. For example, if you have not yet set up Physical Locations in your LearnCenter, a message instead of a field displays, indicating that there are no locations available for selection.
- (Optional) Select a Location from the drop-down list. This field only displays when you select Instructor Led Training Session as the Event Type. If no locations are defined for ILT, this field does not appear.
- (Optional) Select an Instructor's Name from the drop-down list. This field only displays when Instructor Led Training Session is the selected Event Type. If no instructors are defined in the ILT, this field does not appear. To filter by Show Instructors, select this check box to include the instructors' names in the returned results. This field only displays when Instructor Led Training Session is the selected Event Type.
- Click the Open Date check box to filter by an Open Date range. When you click this check box, the From and To fields display. Click these fields to display a pop-up calendar from which you can select a date.
- Click the Close Date check box to filter by a Close Date range. When you click this check box, the From and To fields display. Click these fields to display a pop-up calendar from which you can select a date.
- Click the Event Start Date check box to filter by an Event Start Date range. When you click this check box, the From and To fields display. Click these fields to display a pop-up calendar from which you can select a date.
The various date-related fields above can all be used in conjunction with one another - they do not overwrite or exclude each other. Each date range entered is applied to the current filter and displayed on the Filters section.
To remove a date range from the current filter, clear its check box.
- Click the Event End Date check box to filter by an Event End Date range. When you click this check box, the From and To fields display. Click these fields to display a pop-up calendar from which you can select a date.
|
|
- To narrow a date range to a single day, put the same date in both the Start Date and End Date fields.
- To display all records that start after a specific date, select that date in the Start Date field and leave the End Date field blank.
- To display all records that ended by a specific date, select that date in the End Date field and leave the Start Date field blank.
- If the Start Date is greater than the End Date, an Invalid Date Range message displays.
|
- Select a number from the Display drop-down list to specify the number of records to display per page.
- Click Search to search Enrollments using the specified filters.
or
Click Reset to reset all filters to their default values. The search results display in the Enrollments section.
Sorting Enrollments
Once you have filtered the Enrollments, they display in the Enrollments section. The name of this section changes based on what kind of Enrollment you are looking for: past, current, future. You can further sort the items that display in this section to make the list easier to read or Enrollments easier to find.
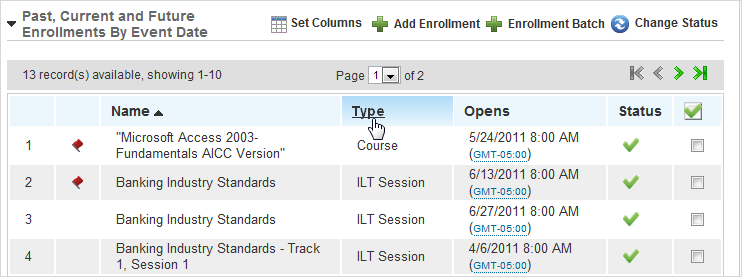
The column headings are clickable hyperlinks that enable you to sort the information on the page alphabetically by name or type, or by date open. Click the link once to sort in ascending order. Click the link again to sort in descending order. For example, click the Name link to sort the Enrollments alphabetically by name. Click the link again to reverse the order. An arrow next to the sorted column heading points up or down to indicate whether the column is sorted in ascending or descending order.
|
|
The Enrolled Users column cannot be used for sorting. |
You can also specify which columns display on the page.
- Click
 Set Columns to display a list of column headings.
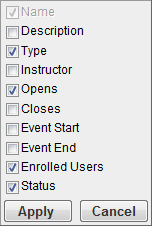
- Click the check boxes next to the column titles you want to display on the page.
or
Clear the check boxes next to the column titles you do not want to display on the page.
|
|
The Name column cannot be hidden. |
- Click Apply.
- Repeat these steps to add or remove other columns.
Changes you make to the column settings are visible the next time you log in to LearnCenter.
Actions You Can Perform for Enrollments
The following action buttons are available for Enrollments on this page.
|

|
Click one of these icons to view information about a recurring Enrollment. The red colored icon indicates the parent or starting Enrollment. The blue colored icon indicates the child Enrollment or next occurrence.
|
|

|
Click this to copy an Enrollment.
|
|

|
Click this to send a message to all students associated with the Enrollment.
|
|

|
Click this to view details about the Enrollment.
|
|

|
Click this to edit the Enrollment.
|
|

|
Click this to add notes about the Enrollment. You can attach files to your notes.
|
|

|
Click this to display the Enrollment Users page for the associated Enrollment record.
|
|

|
Click this, and then click Change Status to change the status of an Enrollment. If the Enrollment is active, it is canceled. If the Enrollment is inactive, it is reactivated.
|
 Related Topics

Copyright © 2010-2018, Oracle and/or its affiliates. All rights reserved.