 on the LearnCenter Design
menu to expand it.
on the LearnCenter Design
menu to expand it.The My Tasks Widget can be used to display a list of training items that are mapped to the current end User. Users can view this Widget to quickly see all of their incomplete Learning Plans and assigned training events, as well as completed training. On the Control Panel:
on the LearnCenter Design
menu to expand it.
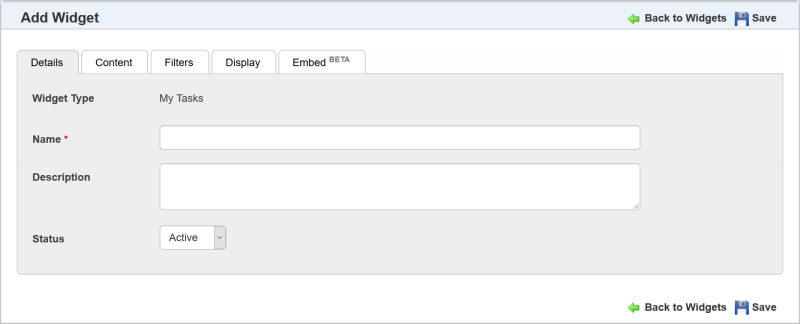
Type a Name for the Widget.
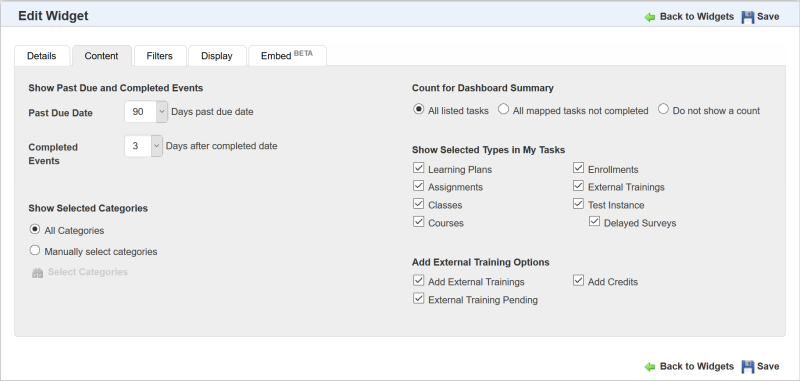
Use this tab to indicate what content you want to display to end Users on the My Tasks Widget page.

|
Remember that Users can also view their completed training items on the Transcript Widget. You may want to allow them to see completed items for a few days on the My Tasks Widget, or you may use the default setting of 0 to hide competed events on the My Tasks Widget. |
By default, all items except for External Trainings are selected, which means they will be displayed on the Widget. At least one item must be selected. When you select External Trainings, the Add External Training Options fields display. Select the Add External Trainings check box to make the link available on the Widget. Select the Add Credits check box if you want to allow Users to select credits for External Training events. Select the External Training Pending check box to include any pending External Training events to end Users. By default, the new check box is not selected. (Note: There is also an External Training Pending check box in the Mini Dashboard section of the Filters tab.)
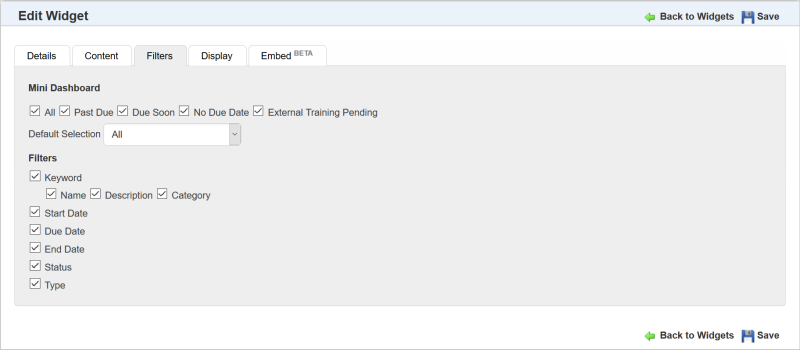
Use this tab to indicate what filters and Mini Dashboard items you want to display to end Users on the My Tasks Widget page.
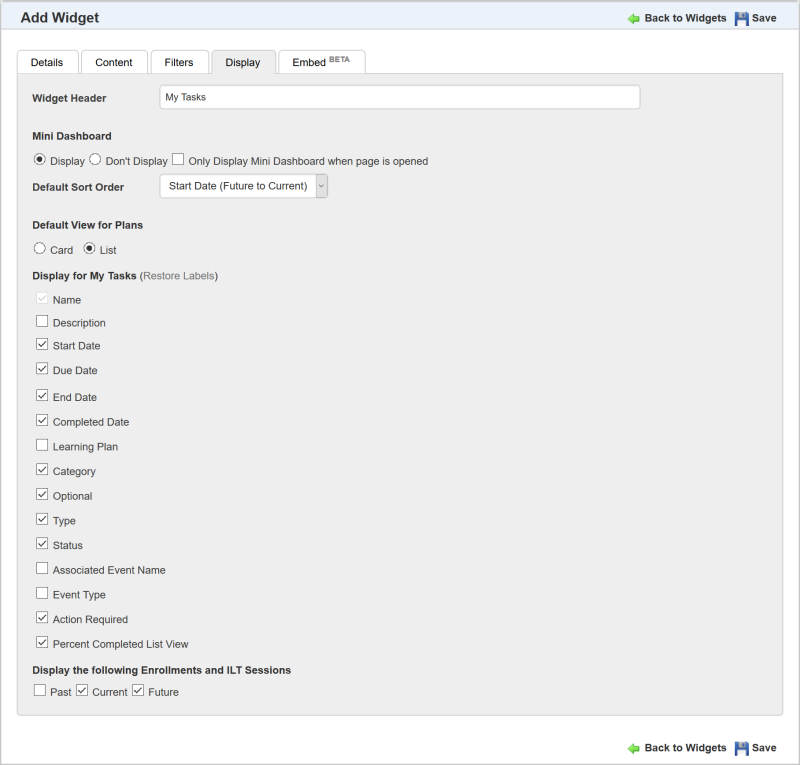
Use this tab to determine how items display to end Users on the My Tasks Widget page.
Select the Only Display Mini Dashboard when page is opened check box to only display the Mini Dashboard when the Widget page opens. You may prefer to show only the mini dashboard if you have a lot of content on the page where the Widget resides. Selecting any dashboard metric expands the Widget to display the appropriate results. Selecting the metric again collapses the Widget and displays only the mini dashboard.
or
Clear the check box to display the entire Widget when the page opens. (Default)
|
|
It is recommended that you limit the number of items you select to keep the end display simple and clean. Not all items are applicable to all event types. |
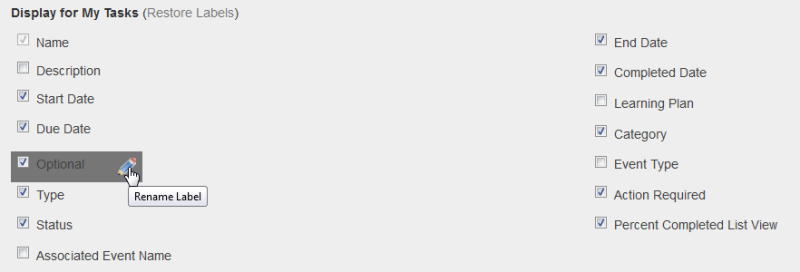
For most items in Display for My Tasks, you can customize the field label (a pencil icon displays when you mouse over the item, indicating that it is editable). Click the  icon to open an editable field and type the text you want to display for the field. You can restore labels to their default settings by clicking Restore Labels.
Some selections are unique to My Tasks in the way they behave:
This indicates to Users that there are still some outstanding tasks that must be completed that are associated with the Learning Plan. These tasks do not appear on the My Tasks page on their own and Users must open the Learning Plan from the My Tasks page to see what those items are. Once enrolled, or once started, those items will then appear on the My Tasks page. If “No” displays for ACTION REQUIRED, this tells the User that everything required on the Learning Plan is either completed or mapped to the User, so they do not need to take further action on the Learning Plan (although they may choose to do additional optional items).
LearnCenter checks whether the minimum number of optional items has been mapped to the User. LearnCenter checks every item on the Learning Plan that is not optional, and checks that the item is mapped to the User. If optional items are mapped to a User, then the item will display as either complete or as an open item for the My Task page. LearnCenter also checks the minimum number of optional items that are required.
|
|
Select the Percent Complete check box to display the Percent Complete column (in the List View) or field (in the Card View) on the Widget. Clear the check box to hide it. You might decide to hide Percent Complete if you want to refine the List View page layout, or because Percent Complete only applies to certain item types. |
|
|
The Enrollments and ILT Sessions past/current/future options are only applicable to ILT Sessions and Enrollments on Learning Plans when the Learning Plan is opened from the My Task Widget. If Learning Plans are disabled, this option is no longer applicable. This option is not used for determining the display of ILT Sessions and Enrollments that are mapped to Users for display on the My Tasks page. If an Enrollment or ILT Session is mapped to a User, and therefore on the My Tasks Widget, it will be listed regardless of the setting of this option. |
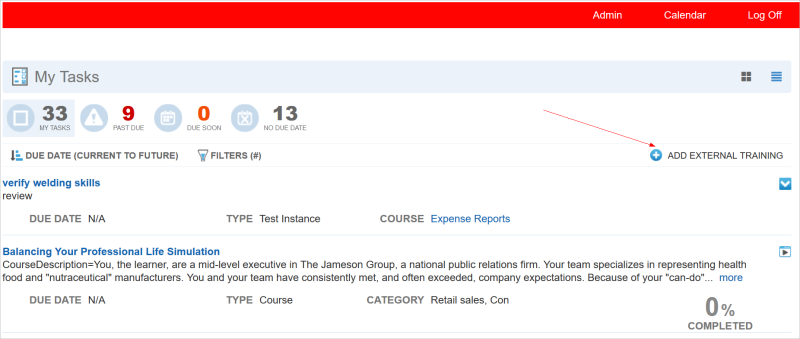
The My Task Widget displays according to the options selected by the Admin in the setup discussed in the previous sections. The illustrations below depict some of those settings.
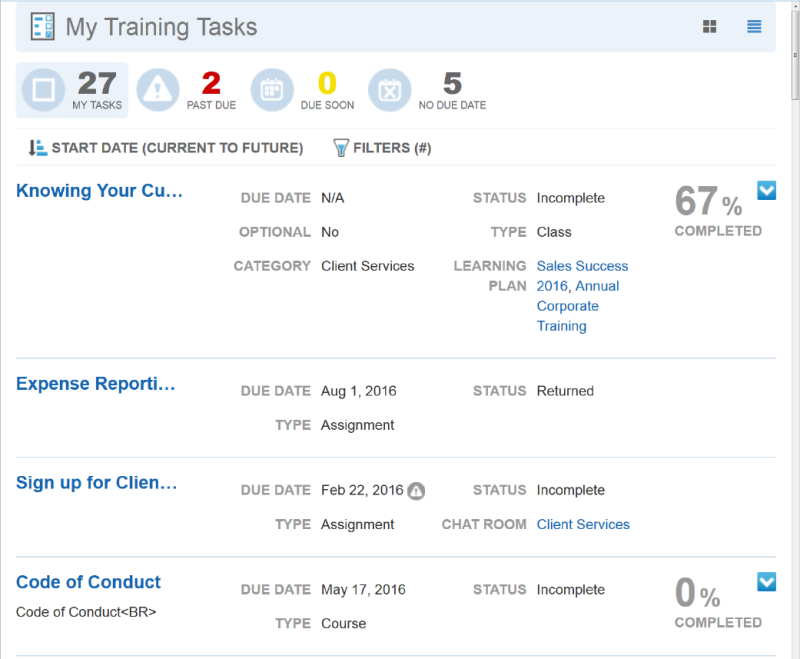
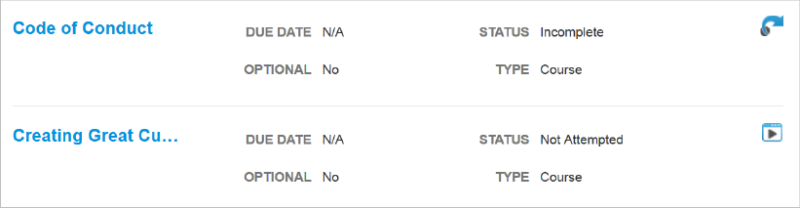
Users can filter the items on the page by clicking the icons in the dashboard at the top of the page. Items that have  displayed next to them can be launched directly from the My Task page.
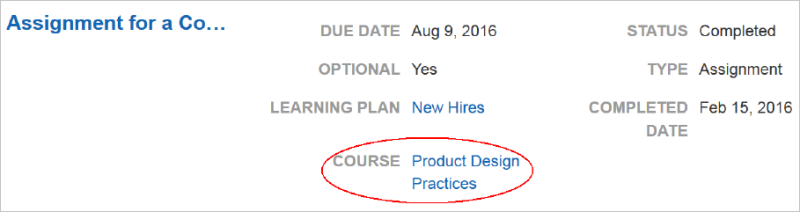
Tasks that are associated with other items are indicated like the following illustration in which the task is associated with a Course (Expense Reports test). The Source of the Assignment is a Learning Plan (New Hires).
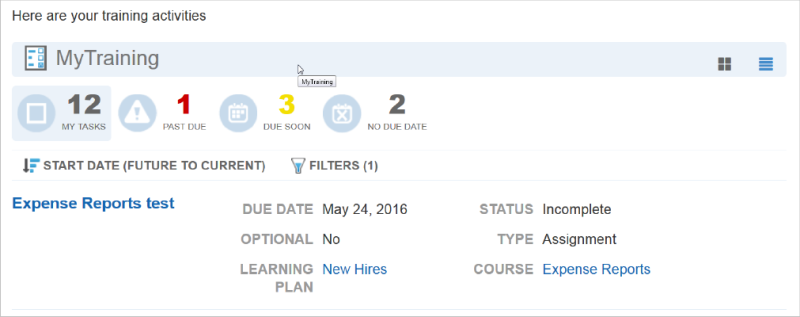
The name of the Course and a hyperlink to the Course are listed in the line item for the task.

|
Important: Items within a Learning Plan may be restricted with sequence rules, and access to the Assignment within the Learning Plan may be limited if sequence rules are enforced and previous items are not completed. However, sequence rules are not enforced on the My Task Widget. This means a User may access and complete an item on the My Task Widget page that they are prevented from completing elsewhere in LearnCenter based on sequence rules set up for a Learning Plan. Users will not be prevented from continuing with out-of-sequence events on the My Takes Widget page. This is applicable to all event types on the My Task Widget. |
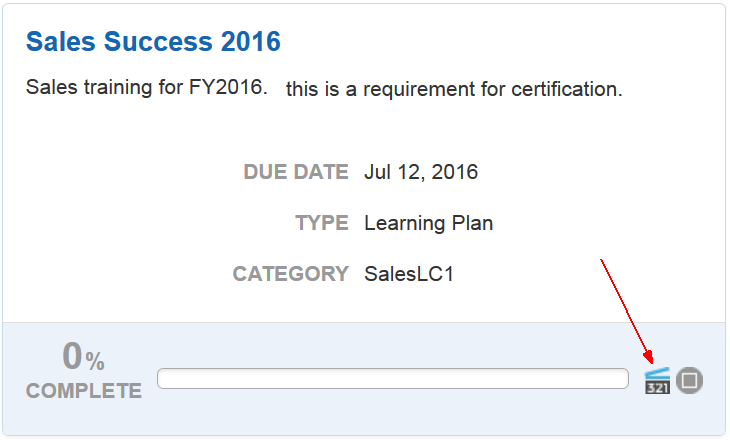
Users can launch Courses from the Widget.
When a Course is available for viewing on a Widget, one of two play icons are visible on the page. The LearnCenter Course Player launch icon looks like this: , and launches Courses inline (embedded on the same page you are viewing, instead of opening in a new browser window) with the Widget. A tool tip displays when you rest your pointer on (“mouse over”) the icon.
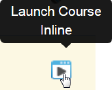
The LearnCenter Course Player launches for single SCO, SCORM 1.2 Courses. See LearnCenter Course Player for further details.
The Classic Course Player icon looks like this:![]() , and launches the Course in a new browser window. A tool tip displays when you rest your pointer on the icon.
, and launches the Course in a new browser window. A tool tip displays when you rest your pointer on the icon.
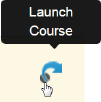
AICC, LearnCenter WYSIWYG Courses, or SCORM 2004 Classes launch using the Classic Course Player.
A certificate icon is displayed for completed learning items that have mapped Certificates.

When a Course or Class is purchased using the LearnCentereCommence feature, it is listed on the My Task Widget as Started, with both the Start Date and Added Date initially displaying the date of purchase. When a User launches the Course or Class, the Start Date changes to reflect the actual date and time the User started. The completion percentage is 0% until the User starts the Course or Class.
The existing Due Soon check box, found on the Learning Plan Settings page (Control Panel > Advance Learning > Learning Plan Settings), also affects the Due Soon flag on the My Task Widget. (Remember that it also affects the Due Soon flag on the Learning Plan Widget.)
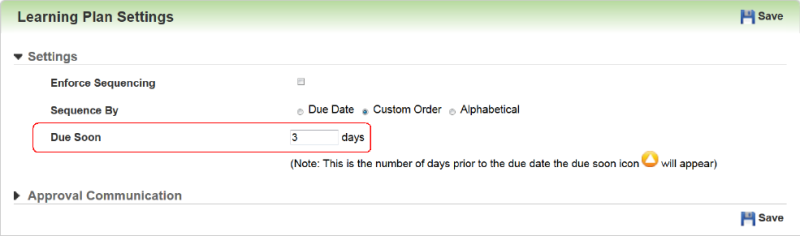
What you set here determines whether the Due Soon icon displays for all learning event types (Assignments, Assessments, Enrollments, etc.) on the My Tasks Widget page.
If you selected the External Training check box and the Add External Training Options check boxes on the Content tab during Widget setup, Users will see an Add External Training link on the My Task Widget.
When Users click this link a new Add External Training page opens, enabling them to create new External Training events.
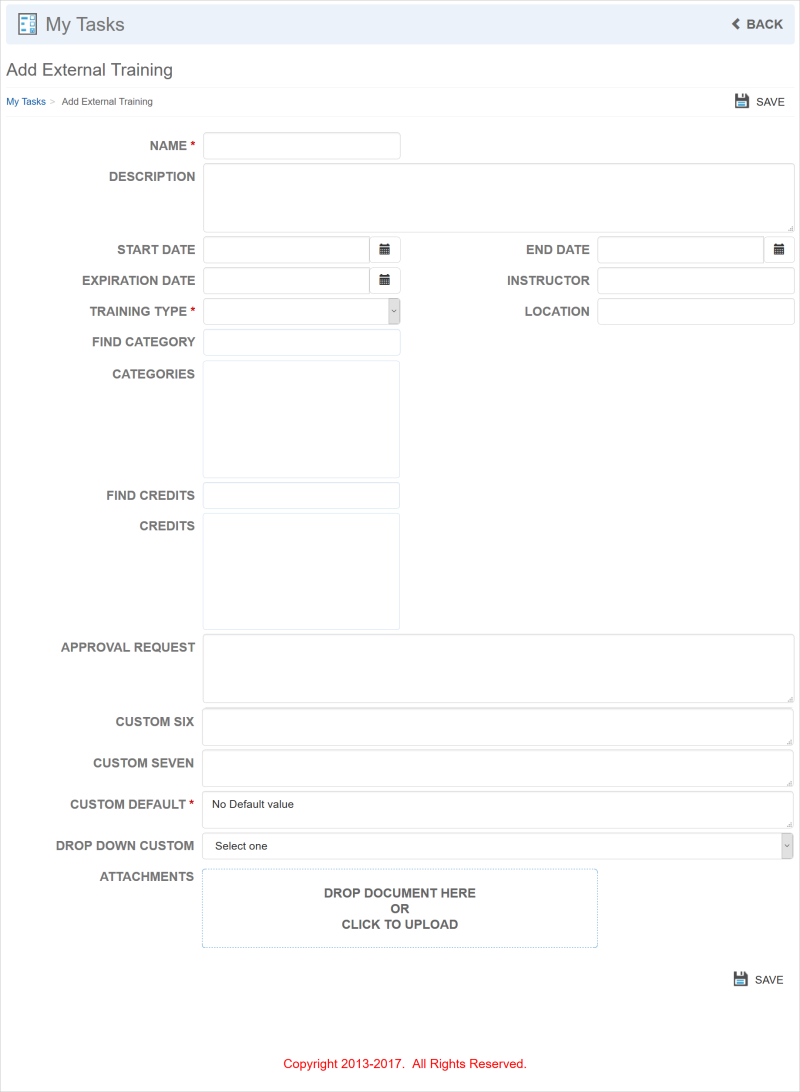
The fields that display on this page are the same as the ones that display for the External Training dynamic object.
Users can enter an External Training Name and optional Description. They can enter dates for training: Dates for the training: Start Date, End Date, and Expiration Date.
There are fields to enter the Training Type, Instructor, and Location. Users can assign one or multiple Categories. For this field, they can type in Category names and LearnCenter will display a list of matching Categories. They can also select Credits in the same manner if you enabled this option during the My Tasks Widget setup.

|
If Users have not been granted the Add External Training Mapped Categories User Permission (under Manage External Training) they will not see the Categories section when they add or edit their External Training. If Users have not been granted the Edit External Training User Permission (under Manage External Training), they will not be able to access the Edit link when they view an assigned External Training. |
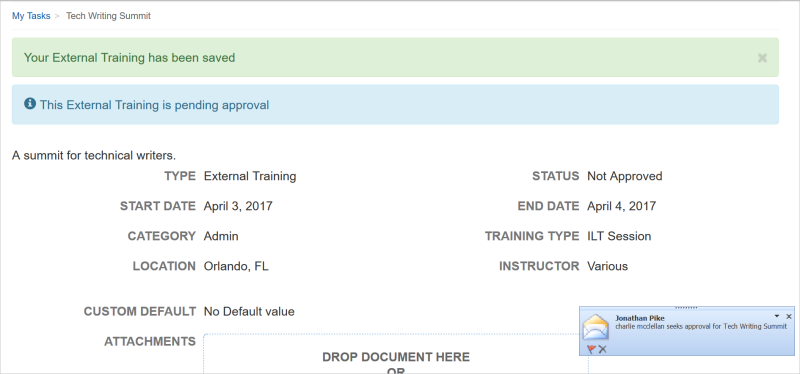
If approvals are enabled, the Approval Request box is available for use. Notice that custom fields are present in the illustration above. The Drag-and-Drop functionality that is available in other places in LearnCenter can be used to add attachments to the External Training request. Users can simply drag items from any folder on their PCs to the Drop Document Here box. They can also Click this Box to open a browse dialogue if they prefer. When Users click Save, the event is saved, and any approval request emails are sent (if this workflow is activated for External Training).

Copyright © 2010-2018, Oracle and/or its affiliates. All rights reserved.
 Related Topics