 on the Social menu to expand it.
 Use the
 There may be many reviews listed when you first visit a page. The filters help you to narrow the results on the page to just those you want. Perhaps you are looking for reviews of a certain type, or written by a particular User. Maybe you only want to look for reviews submitted on a certain date. The more filters you use, the more specific your search. The fewer filters you use, the more results are displayed on the page. If using several filters does not produce the reviews you are looking for, try using fewer filters to broaden the search.
- Click next to Filter to open the section.
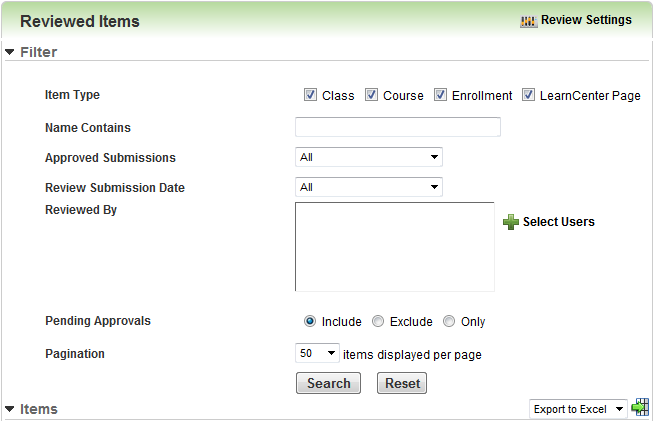
- Click the appropriate check boxes next to Item Type. By default, all check boxes are selected. If you know the review you are looking for is for a particular item type, clear all check boxes except for that item type.
- Type the name or a partial name in the Name Contains field.
- Select one of the following for Approved Submissions to filter by comments that are already approved:
- Equal to - if you want a certain number of submissions. Type the number of submissions in the field that displays.
- Less Than or Equal To - if you want less than a certain number of approved submissions. Type the number of submissions in the field that displays.
- Greater Than or Equal To - if you want to display more than a certain number of approved submissions. Type the number of submissions in the field that displays.
- Between (Inclusive) - if you want to include between a certain number of approved submissions. Type the number of submissions in the field that displays.
- Select one of the following for Review Submission Date:
- Equal to - if you want reviews submitted on a certain date. Select the date on the calendar that displays next to the field.
- Less Than or Equal To - if you want reviews submitted on or before a certain date. Select the date on the calendar that displays next to the field.
- Greater Than or Equal To - if you want reviews submitted on or after a certain date. Select the date on the calendar that displays next to the field.
- Between (Inclusive) - if you want reviews submitted between two dates. Select the dates on the calendars that displays next to the field.
- If you want to find reviews by particular Users, for Reviewed By, click Select Users.
-
- Click Reset.
- Select or click all applicable filters. Each filter is described in the following table:
- Denied Access - Users whose access to the LearnCenter is denied because they have not been approved by an Administrator. They can only access the LearnCenter when an Admin approves them.
- Pending Approval - Users who are awaiting approval to use the LearnCenter. Approved - Users who have been approved to use the LearnCenter Approved Users can access the LearnCenter.
- Removed - Users who have been removed from the LearnCenter.
- Disabled Access - Users who are approved, but who failed logging in multiple times, based on the settings for the LearnCenter password lockout feature. They cannot access the LearnCenter until an Administrator removes the lockout flag on their User accounts.
- Click Search. Users matching your search criteria are listed in the User List.
- Click the check boxes next to the Users you want, and then click Return Selected.
or
Click Return All to return all records and pages. For example, if the search result displays 300 records and the current page displays only first 50 records, clicking Return All returns all 300 records back to the main screen.
You can search for a particular User or a range of Users using several filters. The more filters you apply, the narrower the search results will be. Likewise, the fewer filters you apply, the broader the search results will be.

Click Reset before beginning any new search. To search for a User:
Filter Description Usernames Beginning With Click the first letter of a username or [0-9] to display all usernames beginning with the option you selected. You can also click [Show All] to display all Users. Field(s) Containing Type a Username, First Name, or Last Name, or any combination of the three. You can also type partial usernames, first names or last names if you are unsure of the exact spelling or if you want to broaden your search. Users with Status Select one or more of the following check boxes to search for usernames by status. The more check boxes you select, the broader your search. Note: See Customizing the Login Lockout Feature for additional information on setting up the Login Lockout feature. If you do not select any of the check boxes, the search is performed on Users of all statuses except Removed.
Note: See Customizing the Login Lockout Feature in online help for additional information on setting up the Login Lockout feature. If you do not select any of the check boxes, the search is performed on Users of all statuses except Removed.
*User Group
This field displays if you are using the classic Groups functionality. You can search for users who are part of groups. Select (highlight) the group name in User Group box. If you want to further filter by sub group, click Sub Groups and then select the sub group name in the box. Click Show Users to display the members of this group in the User List.
*Groups This field displays if you are using the Dynamic Groups functionality. The search text box has a limitation of 100 characters. The default number of Groups displayed in the drop-down list is limited to 50.
Type a partial name in the search box and select the Group you want from the drop-down list. Notice that the unique Group Code is listed next to the Group Name in the list.
Display Decide how many results you want to display on the page and select it from the Display drop-down list. The default number of records displayed on the page is 50. You can change this by selecting a different number from the Display drop-down list. You can display up to 1000 records.
- Select one of the following for Pending Approvals:
- Include - to include reviews with pending approvals in the results.
- Exclude - to exclude reviews with pending approvals from the results.
- Only - to only include reviews with pending approvals in the results.
- For Pagination, select the number of items you want to display on the page. The default is 50.
- Click Search. A list of results displays in the Items section. If using several filters does not produce the reviews you are looking for, try using fewer filters to broaden the search.
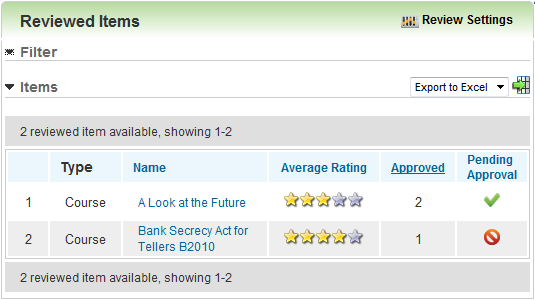
 when there are comments awaiting approval. If
  displays, then all comments have already been reviewed and approved.
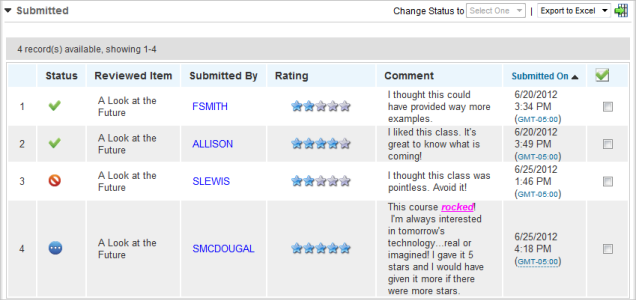
 indicates that the review is pending approval. At this point you have two options:
 .
. .
.  Related Topics