You are here: Content > AICC Course Importer

AICC Course Importer

You can import AICC-compliant Courses directly into your LearnCenter. Each AICC-compliant Course contains a file with the .CRS extension. This file allows other systems to determine the properties of the Course and import it. Files used by the AICC importer (key files) to import an AICC Course into the LearnCenter must be in ASCII format. For detailed information about AICC standards and AICC files, visit www.aicc.org.

Currently, LearnCenter does not fully support AICC multiple AU content. Such content does not track correctly and causes the content to go to completed status prematurely.

On the ControlPanel:

  1. Click  on the Content menu to expand it.
  2. Click AICC Course Importer.

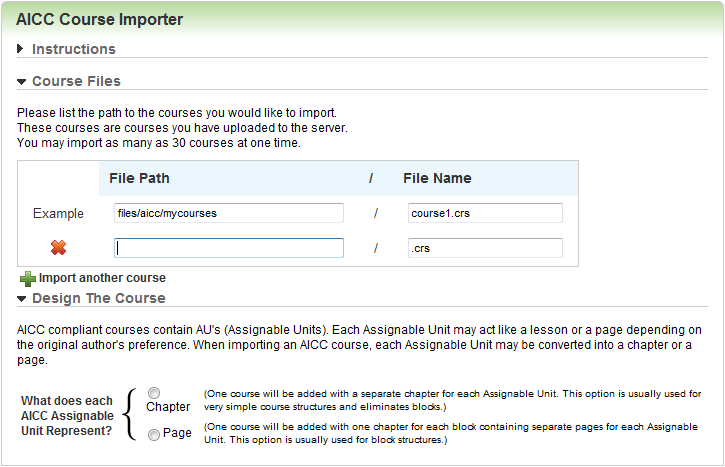
  1. Type the File Path (to your Taleo Learn-provided FTP site) to the Course you want to import following the example shown on the page.
  2. Type the File Name.
  3. Click Import Another Course if you want to import more than one AICC Course at the same time. Another row of fields displays on the page. Complete them as you did in the previous two steps. You can upload as many as 30 Classes at one time. To remove a Course from the upload list, click next to its file path information.
  4. Select one of the following for What does each AICC Assignable Unit Represent:

Each AU may act like a lesson or a page, depending on the original author's preference. With the import process you can convert each AU to either a chapter or a page. For example, the Block and AU structure depends on the author’s preference or authoring tool package. If you select Page, each Block is created as a Chapter and each AU in that block is created as a Page. If you select Chapter, each AU is created as a Chapter of its own ignoring the Block structure.

Sample AICC Course:

Course Name: My Exam Course

Block: Exam 1

AU: Question 1

AU: Question 2

AU: Question 3

Block: Exam 2

AU: Question 1

AU: Question 2


If you select Page, you will see:

Course Name: My Exam Course

Chapter: Exam 1

Page: Question 1

Page: Question 2

Page: Question 3

Chapter: Exam 2

Page: Question 1

Page: Question 2


If you select Chapter, you will see:

Course Name: My Exam Course

Chapter: Question 1

Page: Untitled

Chapter: Question 2

Page: Untitled

Chapter: Question 3

Page: Untitled

Chapter: Question 1

Page: Untitled

Chapter: Question 2

Page: Untitled

Once you select an option, the Design The Course section expands to include additional fields. Many of these fields may have had default settings indicated at the LearnCenter level on the Course Options page, but you can override these settings here.

  1. Select one of the following from the Display this Course drop-down list to indicate how you want Users to access the Course:
  1. Click the Allow Reviews check box if you want to enable Users to submit reviews for the Course.
    or
    Clear the check box if you do not want to enable Users to submit reviews for the Course.
The Allow Reviews check box only displays if the Ratings and Reviews feature is active for this LearnCenter. See Ratings and Reviews for information about this feature.
  1. Select one of the following from the “failed” Behavior drop-down list to indicate how you want to control the completion status of the Course when a “failed” lesson status has been passed to LearnCenter:
  1. Select one of the following from the Display Feedback Form drop-down list:
  1. Select one of the following from the Always Show Next Button drop-down list. The Next button is used to move through all pages within the Course, move to the next Course, or exit out of a Course:
  1. Select one of the following from the Allow Exit on Next drop-down list:

The Allow Exit on Next option works in conjunction with Always Show Next Button. This option is not applicable if the Always Show Next Button is not enabled, a User is not experiencing a Class session, or if there is no Course that is next after a Class session.

  1. Select one of the following from the Navigation Button Tips drop-down list:
  1. Select one of the following from the Center Navigation Buttons Only drop-down list:
  1. Select one of the following from the Show Header drop-down list:
  1. Select one of the following from the Keep Session Alive drop-down list:
  1. Select one of the following from the Scoring Behavior drop-down list:
  1. Select one of the following from the Show Information Bar drop-down list:
  1. In the Import Your Course section, select the Import the Course into the public catalog check box to make the Course available to all LearnCenter. Admins with the ability to create an enrollment will have access to it.
    or
    Clear the check box to only make this Course available to the current LearnCenter. Only you have access to the file and only if you are within the LearnCenter to which it was imported.
If you are only importing one Course at this time, you can append or overwrite existing Courses of the same name.
  1. Select one of the following to specify how the imported Course should be handled:
  1. Select the Course for which you want to create a new version from the drop-down list.
  2. Select the Send Communication Message check box to trigger the sending of a message to all Users who are taking or already took the previous version of this Course.
    or
    Clear the check box to not send a Communication Message.
  3. Select the Reset Score to Zero check box if you want the scores of all Users who took the previous version of this Course to be reset to zero.
    or
    Clear the check box to not reset the scores.
  4. Type a Version Description in the text box.
  5. Click Continue Import. A message displays on the page to indicate if the import was successful. You may receive warnings about certain items when you import. Warnings will not prevent you from working with the file. However, if you receive an error message, you will not be able to continue working with the file.

Related Topics IconRelated Topics


Copyright © 2010-2018, Oracle and/or its affiliates. All rights reserved.