You are here: Virtual ILT > Managing Virtual ILT Events > Adding an Adobe Connec® Event

Adding an Adobe Connect™ Event

Once you have enabled your LearnCenter for Virtual ILT (VILT) Events, you can add a new Adobe® Connect™ Event using LearnCenter.

On the ControlPanel:

  1. Click  on the Virtual ILT menu to expand it.
  2. Click Virtual Events.
  3. Click Add Event.

  1. Select Adobe Connect from the Service drop-down list (if it is not already selected).
  2. (Optional) Click 
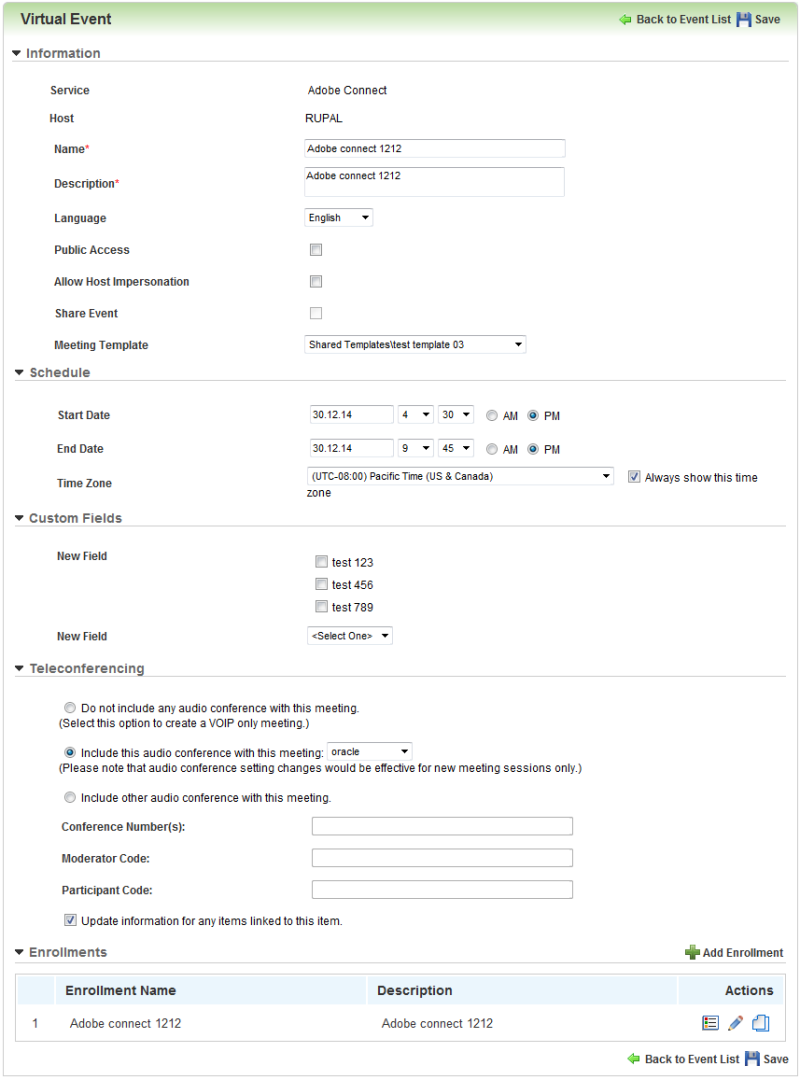
to select a different Host. By default, the current host is you if you already have a Host account set up in this LearnCenter. (If you do not, you are forced to select a Host). If you are creating this Event on behalf of another Admin, be sure to select that Admin's name for the Host.
You cannot change the Host once the VILT Event has been saved.
  1. Type the Name of the event.
  2. Type a brief Description of the event.
  1. Select a Language from the drop-down list. Refer to Adobe Connect System Requirements documentation (provided by Adobe) for an up-to-date list of supported languages.
  1. Click the Public Access check box to indicate that this event is open to anyone who has access to the URL to the meeting room.
    or
    Clear it to indicate it is available only to selected meeting attendants. (Default)
Click the Public Access check box to indicate that this event is open to anyone who has access to the URL to the meeting room. Clear it to indicate it is available only to selected meeting attendants.
  1. Click the Allow Impersonation check box to enable other Admins who are not the Host of this meeting to act as the Host and launch the event.
    or
    Clear it to indicate that only the designated Host may launch the event.
  2. Click the Share Event check box to add this event to the Shared Meetings folder on the Adobe Connect website.
    or
    This enables the event to be visible to other LearnCenter Administrators.

If you do not have the required Adobe Connect permissions to add a meeting to the Shared Meetings folder, and you click this check box, you will not be able to add this VILT event.

If you later edit this event and clear the check box so that it is no longer shared, this information is communicated to the Adobe Connect Server.

Use of this check box does not affect the availability of any associated enrollments.

  1. Select a Meeting Template from the drop-down list. This list matches the list you use on the Adobe Connect website. You must set up meeting templates on your Adobe Connect dashboard on the Adobe Connect website before any templates will appear in the LearnCenter Meeting Template drop-down list.
  1. Select a Start Date and Start Time.
  2. Select an End Date and End Time.

By default, the date fields display the current date. If you want to add an event for another date, click in the Start Date text box. A calendar opens. Select the date from the calendar. The calendar closes and the new date displays in the Start Time and End Time text boxes.

  1. Select a Time Zone from the drop-down list.

The following Time Zone rules apply for ILT sessions:

  • If the ILT Session is created without a location, the default is the LearnCenter's Time Zone. However, if the location is later mapped to the ILT Session, the ILT session's Time Zone is over written with that of the location.
  • Making changes to the location Time Zone does not update the ILT Session's Time Zone. You must map a different location and then re-map the same location to update the ILT Session with the new location Time Zone, or change the Time Zone for the ILT session to match the location.
  • Administrators can also change the Time Zone of the ILT session once it is mapped to the location.
  • You can select the LearnCenter’s Time Zone instead of using the server Time Zone.
  • All the dates and times that are stored in the LearnCenter using the server's timestamp for the learning event are stored in Eastern Standard Time. These dates and times are converted using the server's built-in Time Zone conversion. The server's timestamp is of web server or database server, but both servers use the same Time Zone.
  • The Time Zone priority for users is as follows:
  1. User Time Zone
  2. LearnCenter Time Zone
  3. Parent LearnCenter or Parent Root Time Zone
  4. Server Time Zone

The Time Zone priority accessed through the ControlPanel is as follows:

  1. Learning Event Time Zone
  2. LearnCenter Time Zone
  3. Parent LearnCenter or Parent-Root Time Zone
  4. Server Time Zone
  1. Click the Always Show This Time Zone check box to indicate you want the learning event's time zone displayed to the User.
    or
    Clear the check box to display and convert the learning event's dates into the User's time zone. (Default)
  1. If you have created custom VILT fields, they display next. Complete them as required.
  2. Select one of the following for Teleconferencing.
  1. Click Save.

Once you have added an event, add an Enrollment for it to specify the date and time to enroll Users.

Related Topics IconRelated Topics


Copyright © 2010-2015, Oracle and/or its affiliates. All rights reserved.