You are here: eCommerce > eCommerce Settings

eCommerce Settings

Once Oracle Taleo Learn Cloud Support has set up SSL for your site and you have your PayPal™ merchant account information or your Pay.gov® partner information (if you are a federal government client) you (or your System Administrator) are ready to enable eCommerce in the LearnCenter.

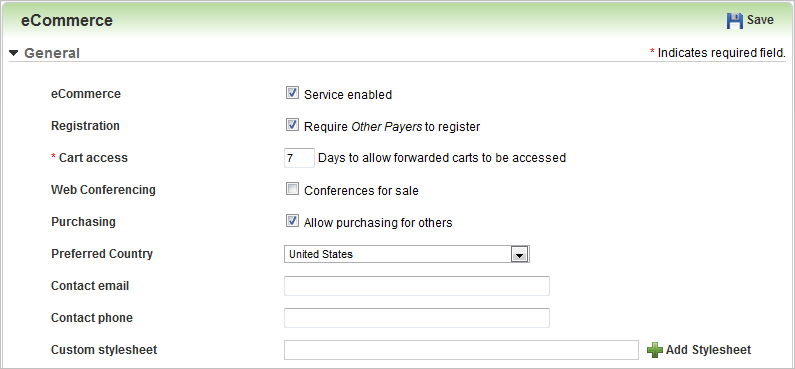
By default, eCommerce is disabled in each LearnCenter until you enable it.

Once enabled, you can set preferences for taxes, subscriptions, forms of payment, currency type, default country name for display at the top of Country drop-down lists, credit card processing and mode, and contact information. To enable these features you will need from PayPal:

If you are a federal government client with plans to use eCommerce, you will need to work with your Oracle Taleo Learn Cloud Project Manager and the Oracle Taleo Learn Cloud technical team to set up your Pay.gov functionality.

On the ControlPanel:

  1. Click   on the eCommerce menu to expand it.
  2. Click Settings.

  1. Click the Service enabled check box to indicate you want to enable the eCommerce functionality for this LearnCenter.
    or
    Clear the check box to indicate you do not want to enable the eCommerce functionality for this LearnCenter. (Default)
  1. Click the Require Other Payers to register check box to force cart recipients who are not currently members of this LearnCenter to register before completing the cart purchase.
    or
    Clear the check box to enable cart recipients to simply pay for the cart items without registering as a member of the LearnCenter.

When other payers register for the LearnCenter, they will be considered Ad-hoc Users of the LearnCenter. This means Users will be permitted to view and access the LearnCenter, but will not be considered “Approved Users”. This is important to note, especially for hosted clients, because Ad-hoc Users will not be counted against Active or Approved Users for billing purposes. However, if an Ad-hoc User engages in any learning activity (such as enrolling for an Enrollment, or viewing and completing Web Based Training), the Ad-hoc User is then considered an Active User from that point forward. No communication is sent to LearnCenter Administrators as a result of this action. The advantage to requiring Other Payers to register is the ability to know who made Shopping Cart payments.

You must have the Self Registration feature enabled for your LearnCenter to allow new Users to self register. Contact Customer Support through My Oracle Support for assistance in enabling or disabling this feature.

Non LearnCenter members to whom a cart is forwarded will only have access to a page containing Shopping Cart items. This page has no mechanism for non members to access LearnCenter.

  1. Type the number of days in the Cart Access_Days to allow forwarded carts to be accessed field to indicate how many days you would like the cart contents to be available for purchase. (Default is 7.)
  2. Click the Allow purchasing for otherscheck box to indicate that you want allow Users to purchase items for other Users (such as a supervisor purchasing training modules for their direct reports). Clicking this option makes the Purchasing for Other Users field available in the Shopping Cart.
    or
    Clear the check box to prevent Users from purchasing items for other Users. (Default).
  3. Select the Preferred Country from the drop-down list. When Users make purchases this country will be listed at the top of the drop-down lists in the PO Information and Billing Information areas of the Shopping Cart check-out page. Setting a default country makes it easier for Users to find that country in the list. It makes scrolling through the list unnecessary, because that country will always be at the top of the list no matter where it falls alphabetically. This is particularly useful if most of your Users will be making purchases from a certain country. Users can still select another country from the list.
  4. Type the email address for the Contact email. This information is used by customers that have problems and need to contact someone.
  5. Type the Contact phone. This information is used by customers that have problems and need to contact someone.
  1. Click Add Stylesheet to add a custom .CSS.

Taleo Learn recommends that you download the current CSS file first from the site, edit the file and then upload it to the Resource Manager. The file can be downloaded from http://[clientdomain]/eCommerce/includes/eCommerce.CSS.

You are redirected to the Resource Manager to upload the file if you did not upload the CSS file first. See Resource Manager for additional information on uploading files to the Resource Manager.

eCommerce pages use a Cascading Style Sheet (CSS) that is separate from the LearnCenter pages. Your existing CSS is used if you do not specify another one.

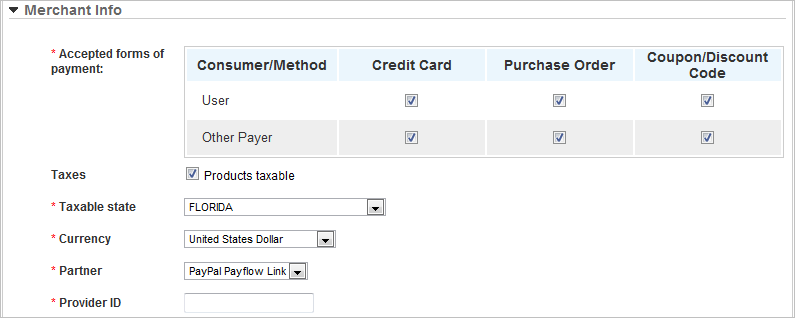
Use this section to indicate how you will accept payments.

  1. Click the Credit Card check box next to User to enable Users to pay for purchases using a credit card. (Default)
    or
    Clear the check box to prevent Users from paying for purchases using a credit card.
  2. Click the Purchase Order check box next to User to enable Users to pay for purchases using a purchase order. (Default)
    or
    Clear the check box to prevent Users from paying for purchases using a purchase order.
  3. Click the Coupon/Discount Code check box to enable Users to use either coupons or discount codes as forms of payments.

    or

    Clear the check boxes to prevent Users from using either coupons or discount codes as forms of payments.
  4. Click the Credit Card check box next to Other Payer to enable Other Payers (such as a Supervisor or Manager) to pay for purchases using a credit card.
    or
    Clear the check box to prevent Other Payers from paying for purchases using a credit card.
  5. Click the Purchase Order check box next to Other Payer to enable Other Payers (such as a Supervisor or Manager) to pay for purchases using a purchase order.
    or
    Clear the check box to prevent other Payers from paying for purchases using a purchase order.
  6. Click the Coupon/Discount Code check box to enable Other Payers to use either coupons or discount codes as forms of payments.
    or
    Clear the check boxes to prevent Other Payers from using either coupons or discount codes as forms of payments.
  1. Click the Products taxable check box to indicate that sales tax applies to products in this LearnCenter. When you select this option a drop-down list displays from which you can select the applicable State for taxation purposes. Only Users in the specified State who purchase items from the LearnCenter are taxed.
    or
    Clear the check box to indicate that sales tax does not apply to products in this LearnCenter. The Tax field on the Shopping Cart page and the eCommerce Order Message does not display if the Taxes_Products taxable check box is cleared.
  2. Select the Taxable statefrom the drop-down list.
  1. Select the Currency the products will use:
  • United States Dollar
  • Canadian Dollar
  • Norwegian Krone (Krona)
  • British Pound
  • Danish Krone (Krona)
  • Singapore Dollar
  • Euro
  • Hong Kong Dollar
  • South African Rand
  • Australian Dollar
  • Japanese Yen
  • Swedish Krona
  • New Zealand Dollar
  • Malaysia Ringitt
  • Swiss Franc
  • Brazilian Real *

*The Learn PayPal™ integration does not support the use of the Brazilian Real. It has been added for display purposes only at this time. To use the Brazilian Real with LearnCenter eCommerce, you will need a custom payment processor. Speak to your Learn Account Manager if you require additional information.

You can only use one currency type per LearnCenter. For example, if you intend to sell products to Users in both the United States and the United Kingdom, you will need to add one LearnCenter for your United States Users and one for your UK Users and then select the appropriate currency for each LearnCenter. In addition, you will need a separate Payflow Link account per currency. Payflow Link is available through PayPal™.
  1. Select your credit card processing Partner. Depending on what you select, the remaining fields on this page vary.
Special configuration is necessary to set up PayFlow Link or PayPal™ Link 2.0 as your billing partner. Contact Customer Support through My Oracle Support when you are ready to set either option up.
  1. Enter the Provider ID as provided by PayPal.
  2. Enter the Username as provided by PayPal.
  3. Enter the Password as provided by PayPal.

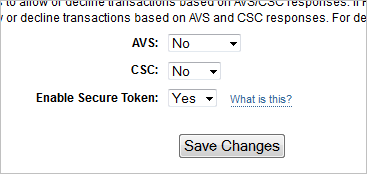
Once you have entered your PayPal Link 2.0 settings in LearnCenter, you must log in to PayPal Manager (http://manager.paypal.com) and change one setting. In the Services Summary section of the page, under Services, click Hosted Checkout Pages, and then Set Up.

Select Yes from the Enable Secure Token drop-down list. Click Save Changes.

IMPORTANT: If you later decide to return to PayPal™ PayFlow Link, you must come back to this page in PayPal Manager and change Enable Secure Token to No. If you forget to do this, PayPal may send you a vague error message when you attempt to make a payment using PayFlow Link.

  1. Enter the Provider ID as provided by VeriSign.
  2. Enter the Username as provided by VeriSign.
  3. Enter the Password as provided by VeriSign.
  4. Indicate which credit cards you accept by moving those credit cards in the left box to the right box. You can double-click the items in the left box, or click an item and then click Add.

By default, no credit cards are honored. You must indicate which credit cards your organization accepts and move them to the right box. You can see the logos of the accepted credit cards on the Product selection page. You are redirected to this page from any page on which you select a Course for purchase. You can also see this page from the eCommerce Dynamic Object.

  1. If you selected Pay.gov or Verisign, select one of the following for Processing mode:

  1. Click the Require subscription to requires users who do not have Administrative rights (Co-Owner permission) to pay a subscription fee to access this LearnCenter. When you select this option, an optional Product SKU text box displays in which you can type the SKU associated with the subscription.
    or
    Clear the check box to indicate you do not require Users to have subscriptions for this LearnCenter. (Default)
  1. If you clicked both the Products taxable and Require subscriptions check boxes, the Subscriptions taxable check box displays. Click this check box to indicate sales tax applies to subscriptions.
    or
    Clear the check box to indicate that sales tax does not apply to subscriptions. (Default)
  1. Click Add Subscription.
  2. Type the Duration (number of days) the subscription will last.
  3. Type the Price of the subscription.
  4. Click the Active check box to make this subscription Active in the LearnCenter.
    or
    Clear the check box to deactivate the subscription.
  5. Type a Product SKU.
  1. Click Save.
When your eCommerce testing is complete and you are ready to take orders, remember to come back to this Settings page and change the Credit Card mode setting to Process.

Related Topics IconRelated Topics


Copyright © 2010-2018, Oracle and/or its affiliates. All rights reserved.