You are here: Advanced Learning > Learning Plans > Adding a New Learning Plan

Adding a New Learning Plan

You can create new Learning Plans. When you create a new plan you can also attach training items to it and determine the sequencing of those items. If you set any default preferences on the Learning Plan Settings page, you will see them when you create the new plan. However, you can override the default settings if you prefer.

You can also create Recurring Learning Plans so that Users can retake training at any interval you set. This offers you an automated way to administer recurring training to your end Users. LearnCenter sends automatic email reminders to Users to prompt them to retake the training. You can configure the recurrence and the email reminders by number of days or months, and you can customize the email reminder as you can with other LearnCenter Communication Messages.

Tips and Considerations: For this Recurring Learning Plans to work, you must enable Multiple Attempts for web based training at the root LearnCenter. Only Courses and Classes are supported for this feature. Pre-existing Learning Plans cannot be edited and set to recurring. Only active Learning Plans can recur. Learning Plans will not recur for mapped Users unless they complete them.

To stop a plan from recurring for certain Users, simply remove them from the Learning Plan.

On the ControlPanel:

  1. Click next to Advanced Learning.
  2. Click Learning Plans.
  3. Click Add Learning Plan.


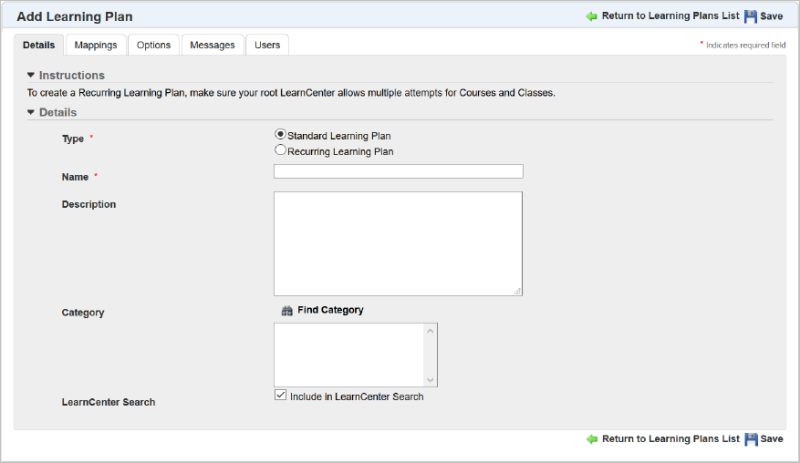
  1. Select one of the following for Type:

Once you click Save, the Type field dims and is no longer editable. If later you decide that you to change the type from Recurring to Standard (or from Standard to Recurring), you will not be able to do so. You will need to add a new Learning Plan in order to use the other Type.

Important: For a Learning Plan to recur, Multiple Attempts must be active in the root LearnCenter.

  1. Type the Name of the Learning Plan.
  2. Type a Description for the Learning Plan.
  3. Click Find Category and select the LearnCenter categories to which you want to map this Learning Plan.
  4. Click Browse or Resource Manager to attach a file to the Learning Plan. Clicking Browse enables you to attach a file from your hard drive or network. Clicking Resource Manager lets you to attach a file that is already in the Resource Manager. You can attach any file type supported by LearnCenter. (See Supported File Types for the current list.) At this time, attachments can only be made to the Learning Plans themselves, not individual items. Completion times can only be given to mapped learning items, not attachments. When you delete a Resource Manager attachment from a Learning Plan, it is removed from the Learning Plan but not the Resource Manager.
  5. Click Save. The Attachments section displays.
  6. (Optional) Add attachments from your hard drive or network, or Resource Manager.
  7. Click the Mappings tab.

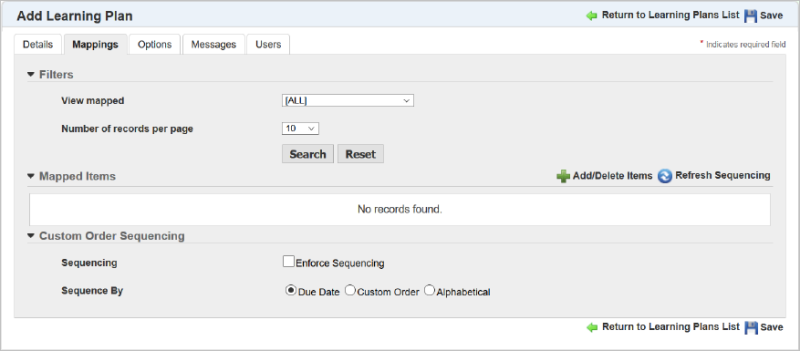
  1. Map the appropriate training items to the Learning Plan.
Only Courses and Classes are supported for use with recurring Learning Plans.
  1. Click the Enforce Sequencing check box to set enforced Learning Plan sequencing as the default setting for all new Learning Plans.
    or
    Clear the check box if you want to make Learning Plan sequencing optional.
If you make sequencing optional, Users will see hyperlinks to all items they have not yet completed in their Learning Plans. If you enforce sequencing, Users will only see the hyperlink to the next item in their Learning Plan.
  1. Select one of the following for Sequence By:
  1. Click Save.
  2. Click the Options tab.

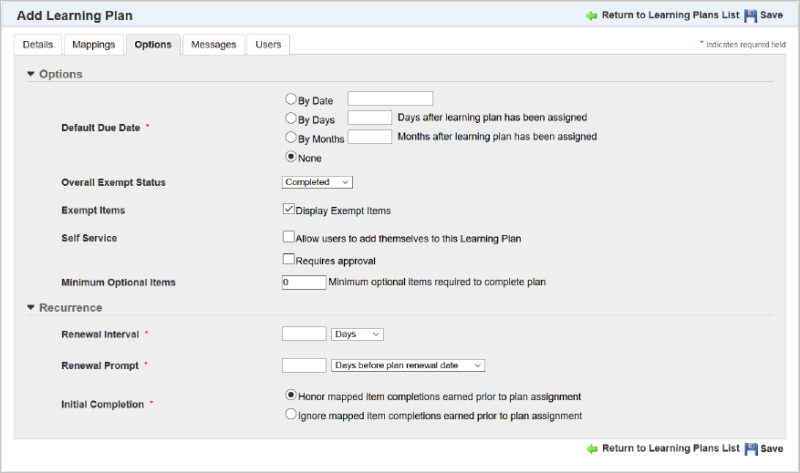
  1. Click one of the following for the Default Due Date:

When you map items to this Learning Plan, the default due date for each item is calculated based on what you indicate here. The only exceptions are for ILT sessions and Enrollments, as both have their own due dates.

For recurring Learning Plans, the Default Due Date acts as the initial completion due date, and is calculated based on when the Learning Plan is assigned to Users.

  1. Select one of the following from the Overall Exempt Status drop-down list:

The default setting for the Overall Exempt Status field was set up in System Options. You can override the original setting on this page.


Note: Once marked as Exempt, a Course Status remains Exempt. Even if the Learning Plan is remapped or recurs, it remains as Exempt unless the User takes the Course, or an Administrator changes the completion status to Incomplete. This means that a User does not have to complete the Learning Plan. Anything that the Course and User is mapped to shows as either Exempt or Completed depending on what you selected for Overall Exempt Status.

  1. Select the Display Exempt Items check box if you want exempt items to display on dynamic objects and reports.
    or
    Clear the check box if you do not want them to display on dynamic objects and reports.
The default selection for the Display Exempt Items check box was set up in System Options. You can override the original setting on this page.
  1. Click the Allow users to add themselves to this Learning Plan check box to indicate you want to enable Users to self-map to Learning Plans from the Learning Plans dynamic object. The Requires Approval check box displays.
    or
    Clear the check box to indicate you do not want to enable Users to self-map to Learning Plans.
  2. Click the Requires Approval check box to indicate that you want designated LearnCenter members to approve User requests to self-map to Learning Plans. You can set designated approvers for these requests on the Learning Plans Settings page.
    or
    Clear the check box to indicate you do not want designated LearnCenter members to approve User requests to self-map to Learning Plans.
  3. Type the Minimum optional items required to complete plan. This is the number of optional items you want Users to complete before the Learning Plan can be considered complete. For example, you may have 3 optional items associated with a Learning Plan. You can require that Users complete at least 2 of these optional items to complete the Learning Plan.

If you chose Recurring Learning Plan on the Details tab, a Recurrence section appears on the Options tab. Use it to set the options for how this Learning Plan will recur.

If you do not set any information here, the Learning Plan cannot reoccur.
  1. Indicate the Renewal Interval.This can set by number of Days or Months. The Days selection has a default maximum limit of 365 days, and must be in a range between 2 and 365. If you have a Learning Plan that must be renewed every 2 years, you can set this field to either 24 Months. The Months selection has a default maximum limit of 60.
Both of these maximums can be raised if necessary. Contact Customer Support through My Oracle Supportand open a service request (SR) asking for these maximum defaults to be raised.
  1. Indicate the Renewal Prompt window. this is the time frame during which you want notify Users that they have a Learning Plan renewal deadline approaching. A message is sent to Users reminding them that they have a Learning Plan that needs to be renewed by a certain date. The Renewal Prompt can be set a certain number of Days before plan renewal date or Months before plan renewal date. The Renewal Prompt value must be greater than zero and less than the Renewal Interval (maximum of 364).
  2. Select one of the following for Initial Completion:
  1. Click Save.
  2. Click the Users tab.
  3. Map Users to the Learning Plan.
    or
    Manually Map Groups to the Learning Plan
  4. Click the Messages tab.
  5. (Optional) Customize Learning Plan Communication Messages for this Learning Plan.
  6. Click Save.

Related Topics IconRelated Topics


Copyright © 2010-2018, Oracle and/or its affiliates. All rights reserved.